
The 1.0 Introduction
Magneto 2 Multi vendor Marketplace allows the admin to uplift the revenue by selling the goods of third-party vendors at the same platforms. Etsy, eBay, etc, are among the best eCommerce stores, successful in keeping their customers engaged by providing services and products of different sellers at the same platform. Nowadays getting customers’ attention and keeping them busy in your store is not an easy task.
Knowband has come with Magento 2 Multi seller Marketplace module to help the admin to build their Marketplace. With the help of Magento 2, multi-vendor Marketplace extension store admins can build a Marketplace like Walmart, Etsy, and eBay and allow multiple vendors to easily register and list their products on the site. Store admin just needs to install the Magento 2 Marketplace plugin and manage everything from the backend of the store.
1.1 Admin Benefits of Magento 2 Marketplace Extension
The various admin benefits offered by Knowband’s Magento 2 Multi vendor marketplace plugin are below:
- The store admin can simply upgrade their eCommerce store into a fully-featured Marketplace with the help of the Magento 2 Multi seller Marketplace module.
- All types of products including Simple, configurable, and bundled are supported by Magento 2 Marketplace Module.
- With the help of the Magneto 2 Multi vendor Marketplace, the store admin can set the global commission as well as a category-based commission to be charged to the sellers. Admin can add category-wise commission as well.
- Seller’s profile and products at the Marketplace can be easily viewed by the store admin from the admin panel of Magento 2 Marketplace Extension.
- The store admin has the access to approve or disapprove the seller account request. Moreover, do the same for the product listings.
- Categories for keeping the products are assigned to the admin from the Magento 2 Multi-vendor Marketplace Module. Sellers can add their products only to the assigned categories.
- The store admin has the chance to enable/disable the seller reviews and seller products reviews from the backend of the Magento 2 Multi vendor Marketplace Extension.
- Magento 2 Marketplace Module offers the admin access to track the sales report and overall transaction of the site.
- Default email templates for notifying the sellers are offered to the store admin by the Magento 2 Multi seller Marketplace module.
1.2 Seller Benefits offered by Magneto 2 Multi vendor Marketplace
- The third-party vendors can easily register as a seller at the site just by filling a form.
- Multiple sellers can register themselves at the Marketplace by filling few details in the form.
- Once the admin approves their account, the sellers can easily list their products at the Marketplace from the seller dashboard.
- Sellers can add their banners, shop logo, and metadata from their seller dashboard.
- Sellers can effortlessly monitor the overall transaction and sales report from the seller dashboard.
- New category requests can be forwarded by the sellers to the admin. In fact, the admin can approve or disapprove the category request from the back-end of the Magento 2 Multi vendor Marketplace module.
- Sellers can add coupons for their store to give a discount to their customers and attract them with different offers.
1.3 Customer Benefits of Magento 2 Marketplace Extension
- The customer is given a wider range of options to choose products from.
- Seller’s profile can be easily viewed by the visitors on the product page.
- Customers can send their valuable feedbacks for products as well as the seller.
- Customers has also an option to register themselves as a seller on Magento2 Marketplace.
2.0 Installation
Buy the Magento 2 Multi vendor Marketplace extension from the KnowBand store. You’ll get the following files:
- Zipped File containing the source code of the module
- User Manual
Follow the steps mentioned below in order to install the Magento 2 Multi seller Marketplace extension in your store:
- Unzip the zipped file. Create a folder (Magento root)/app/code/Knowband/Marketplace
- Upload the extracted content in the above folder via FTP manager (like Filezilla or WinSCP – download here: https://filezilla-project.org/).
- Run below commands via SSH on root Magento directory:
a) composer require phpoffice/phpexcel:1.8.1b) composer require paypal/rest-api-sdk-
php: 1.13.0 - Now run the below commands to install the plugin:
php -f bin/magento module:enable –clear-static-content Knowband_Marketplace
Then, php bin/magento setup:upgrade
php bin/magento setup:di:compile
php bin/magento setup:static-content:deploy - In Admin Panel go to the main menu -> Knowband -> Marketplace.
- The Magento 2 Marketplace extension is now ready for use.
This User Manual will guide the users through the Magento 2 Multi seller Marketplace module configuration and settings.
3.0 Admin Panel
The Magento 2 Marketplace plugin offers multiple options for configuration and management of the online marketplace.
All the tabs are below in detail.
3.1 General Settings
General settings of Magento 2 Multi seller Marketplace is divided into two main types:
the General Settings and Low Stock Configuration
3.1.1 General Settings
The various fields of this General setting of the Magneto 2 Multi vendor Marketplace plugin are below:
- Enable Marketplace: Toggle this button to Enable/ Disable the Magento 2 Multi seller Marketplace module.
- Default Commission: Admin can enter the commission to be charged to the sellers here. The percentage amount set by the admin applies to all the Marketplace sellers by default.
- Categories Allowable: Admin can select the categories he wants to assign the sellers. If he selects no category here, the seller can keep the products in all the categories.
- Register as Seller Field: If the admin enables then the seller can register their store at the Marketplace.
- Show different registration page for Seller: If the admin enables then sellers can register themselves using a separate registration form in the front end of Magento2 Marketplace.
- Enable Bulk Import/Export: Admin can allow the sellers to upload the products in bulk with a toggle of this button.
- Email to seller on order place: If the admin enables this button, the seller will be notified about the orders via email.
- Enable Vacation Mode: When the admin enables, this feature allows the 3.7 Sellers Reviews
All the seller reviews along with their allowable status will list in this section. Sellers to send the vacation request to the admin. - Show Seller information on Product Page: Customers can view the seller information on the product page if the admin enables this button.
- Product Approval Required: If he selects ‘Yes’, then, admin approval will be required to list the product at the site.
- New Product Limit: Enter the product limit here that you want the sellers to list at the Marketplace. If the field is left blank, no product will list.
- Enable Seller Review: Select he selects ‘Yes’, the customers will be able to send their feedback for the sellers here.
- Seller Review Approval: If the admin enables this feature, then, the review sent by the customers will be forwarded to the admin for approval. Only after the approval of the store admin, the review will be visible to the customers.
- Enable Seller List: Enable this button to display the list of the sellers in the front-end of the site
- Activate search box: Enable this feature to allow the customers to search sellers on the seller listing page.
- Enable Seller Coupon: If the admin enables this feature, then the sellers can add coupons for their stores.
- Enable Seller Customer Support: Enable this feature to allow the sellers to view and solve the queries of their customers.

3.1.2 Low Stock Configuration
- Enable Low Stock Notification: If he selects ‘Yes’ then, the sellers will be notified about the low stock via email.
- Low Inventory Limit: This is a mandatory field where the admin is needed to add the limit below which the products are considered low stock.
- When to Notify: Admin has the choice to select the condition when he wants to send the mail to sellers.
- Send Notifications from: Select the emails which you want to send as notifications.

3.2 Custom Fields:
The admin can add different custom fields for the seller’s profile. Admin can align these custom fields under a different section of the seller’s profile. Admin has a variety of choices to select custom fields like text, radio, check-box, etc. And admin can make these custom fields required also.

3.3 Seller List
The admin can monitor the list of the sellers selling their goods at the Marketplace from the backend of the Magento 2 Multi seller Marketplace extension. Admin can view the list of orders and the seller’s products with a click on the right side of each seller.

3.3.1 How to Edit Seller’s Account
The admin even gets an option to edit the profile of the sellers. Click on the name of the seller and a new page will open in front of you. Admin can here view and edit seller account details, orders, product reviews, Customer view, etc.

3.3.2 Seller Account Settings
The following tabs are available in the Seller Account Settings:
- Default Commission: Admin has the choice to set a different commission amount of the seller in comparison with the global commission.
- New Product Limit: The product limit set in the General setting tab is changeable for a particular seller. Admin can set the new product limit for a particular seller here.
- Categories Allowable: Categories other than the global categories can be assigned to a particular seller here.
- Product Approval Required: Product approval settings are changeable in this tab.
- Enable Seller Review: Admin can change the settings for seller review here.
- Required seller Review Approval: The admin can change the seller review approval settings for a particular seller in this field.
- Email to seller on Order Place: If the admin wants to notify a particular seller or not on orders placed then the admin can enable or disable the settings here.

3.4 Seller Account Approval Request
The third-party vendors can fill up the form in order to register their seller account at the site. The seller list along with their account status can be viewed by the admin in this tab of the Magento 2 Multi vendor Marketplace extension.
3.4.1 How to Approve and Disapprove the Seller’s Account
The admin can approve the seller’s account at a button click from the back-end of the Magento 2 Marketplace module.
Just click on the approve or disapprove button corresponding to each seller account as shown below:

If the admin clicks on the Approve button, a pop-up will display asking for permission to approve or disapprove the seller account.

Once the admin approves the seller’s profile, the seller will list it in the ‘Seller List’ tab of the Magento 2 Multi vendor Marketplace module. If the admin clicks on the Disapprove button, a pop-up box asking for the reason for the disapproval will appear.
3.5 Sellers Product List
The admin approves the products from the back-end of the Magento 2 Multi vendor Marketplace extension will list in the Sellers Products tab.
3.5.1 How to edit and remove the details of the products
The store owner can edit or delete the product details of the products list by the sellers if required. Click on the ‘Edit’ or ‘Delete’ button respectively.

3.6 Product Approval List
The third-party sellers can list their products from the seller dashboard of their profile. The products added from the dashboard list in this tab of the Magento 2 Marketplace module for approval. Admin approval is required only if the admin enables this feature. The store admin can approve or disapprove the product at a button click.
Only the products that the admin approves get listed in the Product Approval List tab of the Magento 2 Marketplace module as shown in the figure:

If the admin clicks on the Approve button a pop-up will display with the message “Do you want to approve product?”. Click ‘Ok’ if you want to go ahead with the action.
3.7 Seller Membership Configuration
This page contains all the basic settings which the Store admin needs to control the membership plans.

Enable Seller Membership: Toggle this button to enable the membership plan functionality.
The number of days left to upgrade plan when warning message will display: Enter the number of days after which a warning message will display to the sellers to upgrade plan.
Notification when the number of products left to upgrade the plan: Enter the number of products left after which a warning notification will display to the sellers to upgrade the plan.
Select order state after which the membership plan will activate: Admin can select the order state on which membership plan orders will activate.
Show custom Memerbship plan page: Using this tab admin can enable a custom membership plan page for the sellers.
Add URL for the custom page for membership plan: Enter the link of the custom membership plan page using this tab.
Provide rebate to the current sellers for the first time: If the store admin enables this button then the seller’s products remain active until this period.
Rebate Duration: Enter the Rebate duration using this button.
3.8 Membership Plan
Store admin can add new membership plans, edit and disable them from this page.

Enable Plan: Toggle this button to enable the membership plan.
Plan Name: Enter the membership plan name using this button.
The Plan Price: Enter the membership plan price.
Plan Duration: Enter the duration of the plan until it remains active.
Number of Products: Enter the number of products that a seller can upload to the membership plan.
Plan Image: Upload the image of the membership plan.
3.9 Seller Membership Plans
From the seller membership plan page, the store admin can view the assigned membership plans for the sellers. Store admin can view membership plan Id, order Id, seller Id, Plan duration, status, etc.

3.10 Seller Membership Reminder
Store admin can send reminder messages to the sellers whose membership plan is about to expire.

Reminder Name: Enter the name of the reminder from this tab.
Enable/Disable this reminder: Toggle this button to enable or disable the reminder.
The number of days left to upgrade plan, when notification will be sent: Enter the number of days after which warning reminder will be sent to the sellers.
Email subject of reminder: Enter the email subject of the reminder from this button.
Email template for a reminder: Customize the email template of the reminder message from this tab.
3.11 Assign Membership Plan
Store admin can assign a membership plan to the sellers by just selecting the plan and sellers.

3.12 Product Reviews
The customers can give ratings and write reviews for the products if this feature that the admin enables from the back-end of the Magento 2 Marketplace plugin. If the admin enables this, the customers can leave their reviews by clicking on ‘Write a Review’.
The reviews written in the front-end will list in the back-end of the Magento 2 Multi vendor Marketplace plugin as shown in the image below:

Admin can click on the ‘Edit’ button to edit or approve the product reviews. This will redirect you to the review edition page of the Magento 2 Multi vendor Marketplace module.
The various fields of this interface are below:
- Product: The name of the product for which the review is posted will be shown here.
- Author: The name of the customer sending the review will be shown here. The admin can change the name if required.
- Summary Rating: This section will by default show the rating given by the customer.
- Detailed Rating: The admin can even change the rating in this field.
- Status: Admin has the access to update the status of the Review here.
- Summary of Review: In this field, a summary of the review will be available.
- Review: The review entered by the customer will be shown here. The store owner can edit the review if required.

To get the changes reflected, the admin needs to click on the “Save Review” button at the top right side of the page.
3.13 Sellers Reviews
All the seller reviews along with their allowable status will list in this section.

The admin can view the detailed information by clicking on the “View” button on the right side of each review. Once the view button is clicked, a pop up will appear in front of you.

3.14 Sellers Review Approval List
The customers can even give reviews to the sellers if the admin enables this feature from the back-end of the Magento 2 Multi seller Marketplace module. In order to leave the review, the customers can click on the ‘Write Review’ link on the product page of the website. Refer to the image below:

This will redirect them to an interface where they give ratings and reviews to the sellers. The seller’s reviews entered here will list in the Sellers Reviews Approval Request tab of the Magento 2 Multi seller Marketplace Module.
The admin can view, Approve, Disapprove and Delete the reviews by clicking on the “View”,” Approve”, “Disapprove” and “Delete” buttons respectively for respective functions.
3.15 Category Request List
The admin assigns the category to the third-party seller for listing the products. The sellers can even request the admin to add a new category from their Dashboard. The category requests sent by the sellers will list in the Seller Category Request List tab of the Magento 2 Marketplace extension as shown in the image below:

Only after the admin approves the new category request, only then the seller will be allowable to list their product in the assigned category. Admin can approve or disapprove the new category request by clicking on the “Approve” or “Disapprove” button respectively.
3.16 Sellers Vacation Request
The Magento 2 Marketplace extension comes with a feature that allows the sellers to go on vacation. If he enables this feature from the Settings Tab of Magento 2 Multi vendor Marketplace module, only then the sellers can request for the same. Admin can view the list of sellers on vacation from this tab

3.17 Best Selling Products
The admin can view the list of best-selling products of a particular seller. The list of best-selling products can be filtered on the basis of the time period, category, and seller.

3.18 Email Templates
The Magento 2 Multi seller marketplace plugin offers various pre-designed email templates for various scenarios. The store admin can even customize the email templates as required by clicking on the “Edit Template” button.

On clicking the “Edit Template” button, the admin can modify the subject and the content of the email at his convenience.

3.19 Cron Instructions
The admin can run the Cron jobs to sync the changes from the backend of the Magento 2 Multi seller Marketplace module with the frontend of the store. Further, he can run Cron jobs from the backend are below:
- Vacation Cron: Vacation Cron job runs to disable the seller’s products from the front end of the store when the sellers go on vacation.

- Low stock Notification Cron: Cron jobs run to alert the seller about the low stock products.

3.20 Seller with Import and Export feature
A list of sellers that can upload products in bulk from the seller dashboard can be viewed by the admin from this section. Admin can disable the feature by clicking on the “Disable” button on the right side of the seller.

3.21 Admin Shipping
With the help of this feature, the admin can add their shipping prices based on the weight and price range of the products. This feature will allow them to fix a shipping price for a particular weight range or price range. Admins can use this feature while adding a new shipping method.

3.22 Transaction and Earnings
3.22.1 Commission
The store admin even gets an option to monitor the total transaction, seller earnings, and admin earnings. The name of the seller, along with its Email-id is also there.
3.22.2 Category Wise Commission
With Magento 2 Marketplace module, the store admin gets access to filter the commission category-wise. Admin can easily view the total earning, total commission for a particular category in Category Wise Commission.

3.22.3 Seller Wise Commission
The admin can view the list of total products sold, total earning, seller earning and admin earnings from the backend of the Magento 2 Marketplace plugin. To view the detailed transaction action, the admin needs to click on the “View” button.

Moreover, Magento 2 Multi seller Marketplace extension allows the admin to add a new transaction detail from the admin panel of the store. As soon as the admin will click on the “Make New” button a pop-up will appear in front of him. Admin needs to fill in all the details in the popup and click on the submit button to submit the new transaction entry.
3.22.4 Seller Payout
The sellers can view the payout requests that the admin approves from the Sellers Payout section.
3.22.5 Seller Payout Request
Payout Request sent by the sellers can be viewed by the admin from the backend of the Sellers Payout Request. Admin can approve/ disapprove the payout request with a few clicks. Once the admin clicks on the “Approve” button a pop window as shown in the figure will appear.

When the admin will click on the “Disapprove” button, a dialogue box with a comment field will appear. Once the admin clicks the submit button after filling the comment fields, the request will not approve.
3.22.6 PayPal Payout Request
Magento 2 Multi seller plugin offers admin the access to set the PayPal Payout Settings from the backend of the store. Admin needs to fill the Client ID, Client Secret key, Paypal Mode, Paypal Email Subject, and Paypal Currency in the backend of the store.

4.0 Front-end UI
Once the Magento 2 Marketplace extension is successfully installed at the Magento 2 store, the third-party sellers can register by filling a simple form from the front end of the store. For easy management of the shop, the seller gets access to their dashboard.
4.1 Seller Registration
Sellers can register their accounts by filling out the registration form from the front end of the store. The registration form format is the same for both the sellers and customers. To register as Sellers, the seller needs to select an additional checkbox in the form.

4.2 Seller Dashboard
Once the account registration procedure is completed from the back-end of the Magento 2 Marketplace plugin, the seller will get access to the Dashboard. Sellers can view the entire sales report, product list, and order details from the seller dashboard. New Category requests, Payout requests, and vacation requests can be sent by the sellers from the dashboard.

4.2.1 Seller’s Profile
The sellers can edit their profile and personalize their shop from this Seller profile tab of the dashboard. Sellers can add and edit Shop Title, Address, and Social account links in this tab.

4.2.2 Product Catalog
The sellers can follow the path mentioned below in order to add a new product. As soon as the seller will click on the Product Catalog, the following page will display. The seller can view the list of products listed at the Marketplace from the Product Catalog.3.15.6 PayPal Payout Request.

In order to add a new product to the list, click on the “New Product” button
Go to My Account -> Dashboard -> Products Catalog.
4.2.2.1 How to add a new product
Products already listed by the sellers get listed in the Seller dashboard tab. Once the admin clicks on the “New Product” button, a popup menu with attribute fields and product type field display.
Select the attribute fields and product type field and click on the “Continue” button.
This will redirect you to the ‘New Product’ page. Fill up the mandatory field details in order to add the product.

4.2.3 Orders
The list of orders and their related details can be viewed by the seller on this tab of the Seller Dashboard.

4.2.4 Product Feedback
The sellers can view the Review received on the products in the Product Review Tab of their Dashboard. All the reviews received will list as shown in the image below:

4.2.5 My Reviews
My Reviews tab in the seller’s dashboard lists out the seller reviews received on their profile.

4.2.6 Earnings
Sellers can view the total sale, total earning, total order, and total product sold in this tab. The vendors can even apply a filter to the earning results as per their requirements. The total earning history will display as shown below:

4.2.7 Transaction History
The seller can view their entire transaction history in the transaction tab.

4.2.8 Payout Request
Sellers can view the list of payout requests sent to the admin from the Payout Request tab. Payout Request status can be also be monitored by the seller they can even send category requests to the store admin. Moreover, sellers can generate a new payout request by following the steps:

Go to the Dashboard -> Payout Request
Click on the “+” icon on the right side of the New Payout Request. Once the “+” is clicked, a new dropdown will appear.

- Amount: Enter the amount value here.
- Request Reason: Enter the reason for Payout Reason in this field.
Click the “Submit” button at the button of the page to submit the payout entry.
4.2.9 New Category Request
Sellers can view the categories assigned by the admin to them. Additionally, a seller can send a new category request to the store admin by following these simple steps.
In order to send a category request, go to the Dashboard -> New Category Request, a page will open in front of him.

- Choose a Category: Select a category you want to request.
- Reason: Give an appropriate reason for requesting that category.
4.2.10 My Vacations
My Vacation tab displays the list of vacation requests already submitted by the sellers to the admin.

4.2.10.1 How to set a new Vacation entry
Once the seller is on the My Vacation section, click on the “Set New Vacation” button, a popup window will open in front of them with the following fields:
- Start date: Enter the start date of the vacation here.
- End Date: Enter the last date of vacation here.
- Your comment on the vacation: Enter details related to the vacation here.

Click on the “Create” button here and the request will be sent to the admin for approval then.
4.2.11 Seller Coupons
Using this feature sellers can generate coupons for their customers. Sellers can use different variations for creating their coupons like users per coupon, coupon type, etc.

4.2.12 Low Stock
The low stock tab displays the list of products that are low in stock. The seller can set the Low stock Configuration setting from this section. Click on the “+” sign on the right side of the configuration and fill the following field there.
- Low Inventory limit: Enter the threshold limit below which you want to get notified.
- Receive Low Stock Notification: Enable/ disable the Low stock Notification from this field.

4.2.13 Product Import and Export
In order to upload the products in bulk, sellers need to generate a sent product import/ export request to the admin. Enter the comment in the box, and submit the request to the admin. Once the admin approves the request, only then the seller can upload the products in bulk.

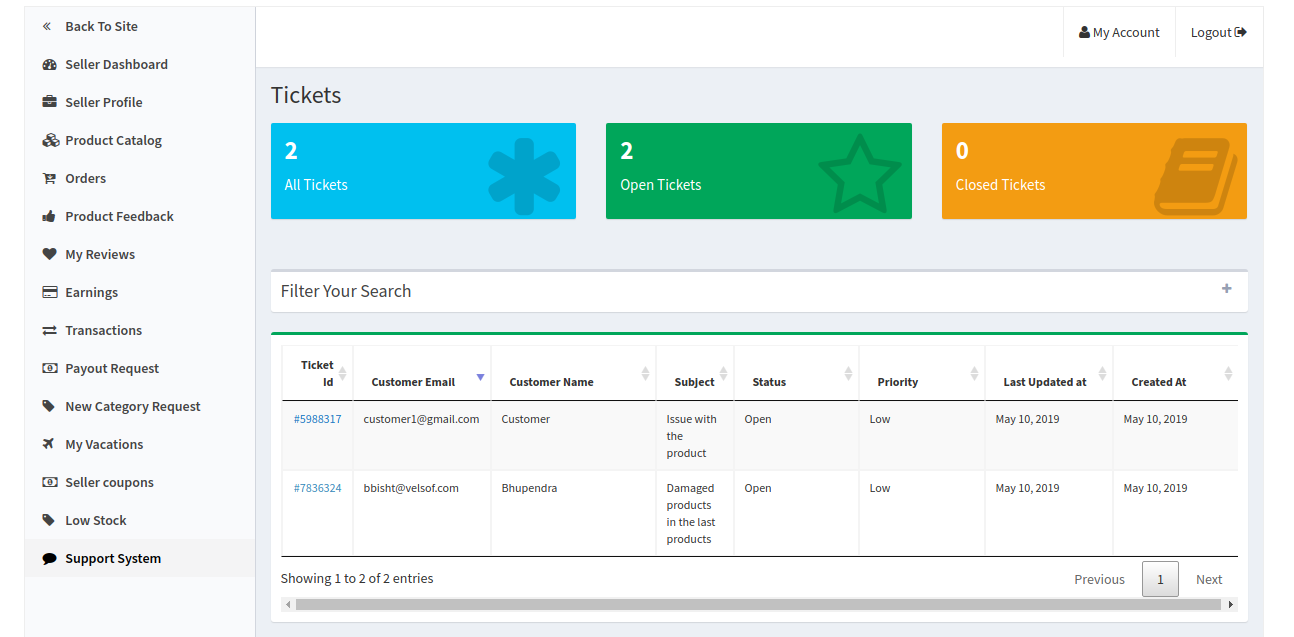
4.2.14 Support System
This feature allows the sellers to view the queries of their customers in the form of tickets. When the seller clicks on the Ticket ID they are able to see the full detail about the query and even reply and change the status of the query.
4.2.15 Seller Shipping
By using this feature sellers can add their shipping prices based on the weight and price range of the products. This will allow them to fix a shipping price for a particular weight range or price range. They can use this feature while adding a new shipping method.

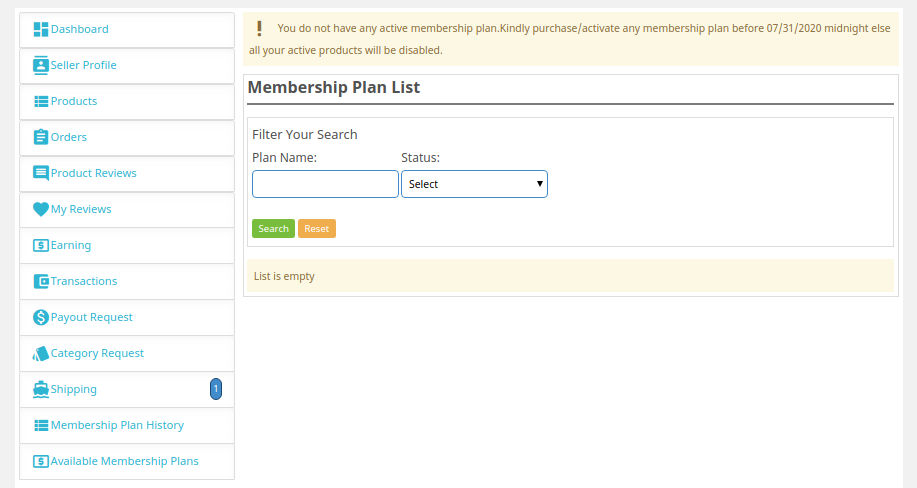
4.2.16 Seller Membership Plan
Sellers can check their membership plan history by applying filters. Under the filters, sellers have to fill in the plan name and the order ID of the membership plan for checking the history of the membership plans.
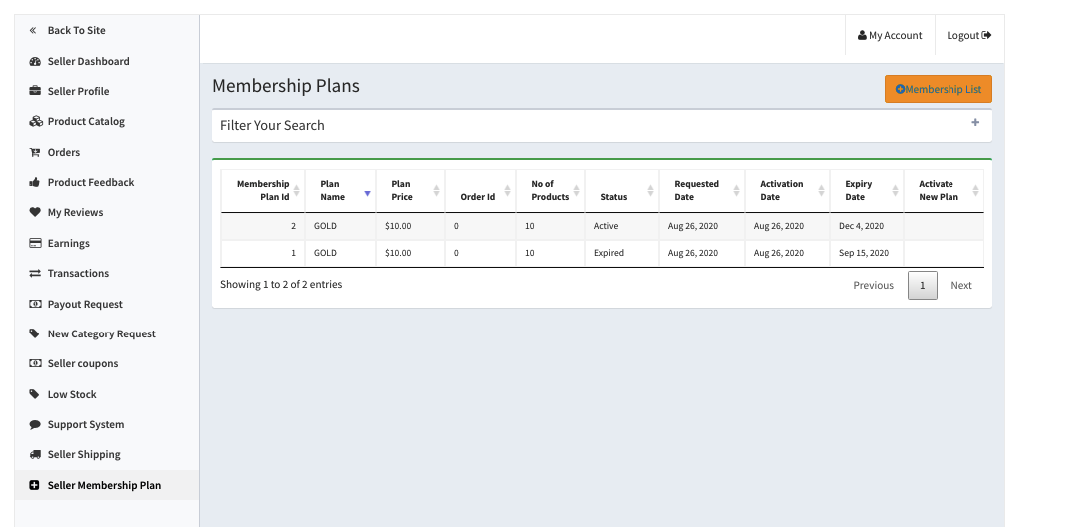
To add a new membership plan sellers have to click on the “Membership List” button.

For further information, refer to the following links:
