If you upgraded Windows 10 from an old version of Windows, you have a Windows.old folder on the C: drive of your computer. In this post, we show you what Windows.old folder is, whether you can delete Windows.old folder and how to delete Windows.old quickly.
What Is Windows.old Folder
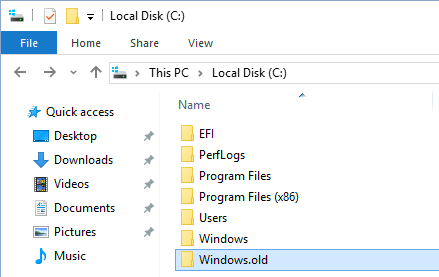
When you upgrade Windows 7/8/10 to a newer version, your previous Windows installation is moved to a folder named Windows.old. Windows.old is created by Windows Setup and is an archive of your old Windows installation. It is regarded as your return ticket to your previous Windows version within 30 days.
So, what is saved in Windows.old? In particular, you will find the old registry hives in C:Windows.oldSystem32config, and your personal profile files in C:Windows.oldSystem32Users, which includes Cookies, Start Menu, UserData and more.
How to Delete Windows.old Folder
Let’s start with a question put forwarded in tenforums.com:
I’m in the Windows Insider program and have updated Windows 10 several times now. Each time, creating a Windows.old folder. Do I need to keep these, and if not, what’s the best way of deleting them? This is probably a silly question, but better safe than sorry. Thanks!
Windows.old usually takes 10 GB around disk space, depending on how large your previous Windows installation was. Hence, you may wonder: can I delete Windows.old folder to get spare disk space, and how can I delete Windows.old, just like the one wondering in tenforums.com.
The answers here are positive. As long as you’re satisfied with your current Windows system and don’t want to downgrade, and as long as you have saved all your important files from Windows.old, you can go ahead and remove it.
Detailed steps are shown below, just keep reading.
1st Move: Show Windows.old Folder
Windows.old is regarded as a system file. In case you have set to hide protected operating system files, you need to make Windows.old appear on your PC to get your important files (if there is any) from it in advance. So the first move here is to make sure that option is unchecked.
Take deleting Windows.old folder in Windows 10 for example.
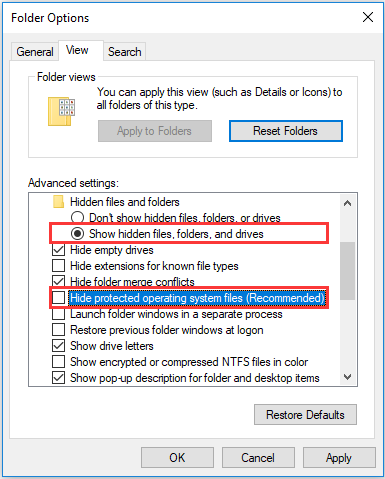
Step 1. Go to File Explorer, navigate to View > Options > Change folder and search options to get Folder Options window.
Step 2. Then navigate to View tab. Under “Hidden files and folders”, be sure to select “Show hidden files, folders and drives” and uncheck the “Hide protected operating system files (Recommended)”.
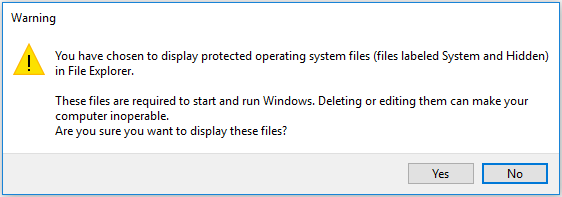
Step 3. Immediately after you uncheck the “Hide protected operating system files (Recommended)”, you will receive a warning message saying that these files are required to start and run Windows, deleting or editing them can make your computer inoperable. Just click Yes to confirm the display of these files.
Step 4. Finally, press OK on the Folder Options window to save your change.
2nd Move: Save Important Files from Windows.old
Before you delete Windows.old folder, you’d better take the chance to save important files from Windows.old if there are.
Step 1. Please go to C:Windows.old to find the folder named with your username.
Then open it and copy the files you need including documents, music, pictures, etc. to another location. If you want to import your Windows Live Mail messages from the Windows.old folder, you can click here to know the detailed steps.
Now it’s time for you to delete Windows.old files.
3rd Move: Delete Windows.old Files
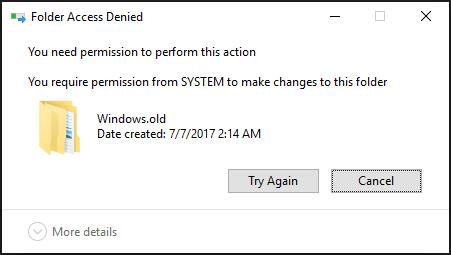
Please note that deleting Windows.old is different from deleting a normal folder. You can’t delete Windows.old folder by simply right clicking that folder and choose Delete. If you do like this, you will need permission from system to delete Windows.old. See the following picture:
So, you should refer to either of the two ways below to delete Windows.old files.
Way 1: Use Disk Cleanup
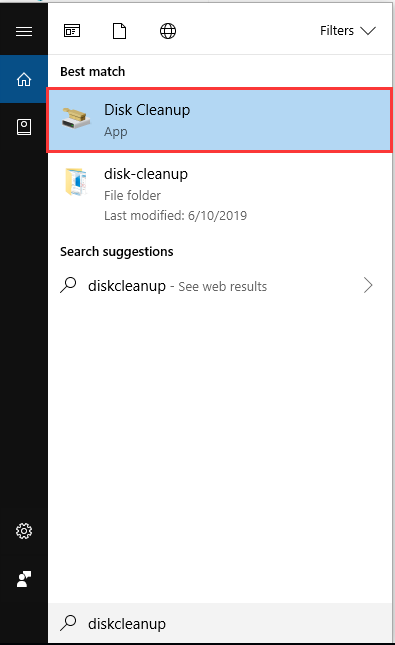
Step 1: Click in Windows’ search field, type “Cleanup”, then click Disk Cleanup form the best match.
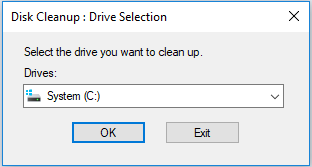
Step 2. You will come across a window allowing you to select a drive to clean up. Since Windows.old is saved to C: and C: is selected here by default, you just click OK to continue. Disk Clean-up will take some time to calculate how much space is able to be released. Please wait patiently.

Step 3. Click the “Clean up system files” button. Again, choose the C drive to.
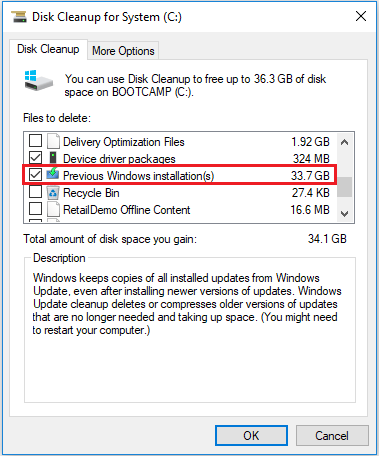
Step 4. Wait a bit while Windows scans for files, then scroll down the list until you see “Previous Windows installation(s).” Check the box next to the entry, then make sure there are no other boxes checked (unless you do indeed want to delete those items). Click OK to start the cleanup.
By doing these, Windows.old should have been deleted.
Way 2: Use CMD
However, some users report that Disk Cleanup does not delete Windows.old. Here is a true example we extract from forums.lenovo.com:
I just bought a Lenovo Y50-70 notebook, and it came with windows 10 preinstalled. Fiddling around, I found a Windows.old folder in the C: drive, so I figured the shop already did the upgrade for me. I tried using disk clean up to remove Windows.old folder, but after it’s done, the folder still doesn’t go, occupying around 1GB of my storage.
Why can’t I delete Windows.old? Any help would be appreciated.
At this time, we strongly recommend using CMD. How to delete Windows.old using CMD? Want to know the best part? Please follow the guide below:
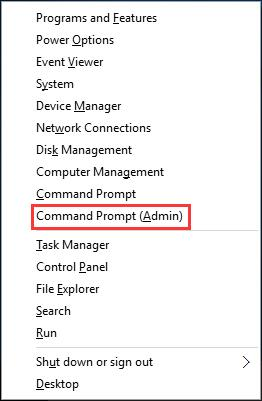
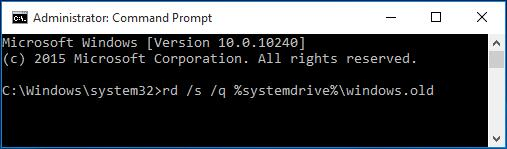
Step 1. Press “Win + X” to call out the power user menu. Then select “Command Prompt (Admin)” and allow it to take control of your PC.
Step 2. In the command prompt window, type “RD /S /Q %SystemDrive%windows.old” and hit Enter. Then Windows.old folder will be deleted in Windows 10 without any obstacles.
More Windows 10 Tips: Hard Drive Is Full without Reason in Windows 10/8/7? Solutions Are Here.
Downgrading Windows 10 to the Previous Version
If you are not certain whether you want to downgrade after 30 days, we suggest that you make a backup of the current Windows 10 before you delete Windows.old. Then use the Windows 10 copy to downgrade to the previous Windows 7/8 or Windows 10. In this way, if someday you want to go back to the previous version, you can avoid the reinstallation.
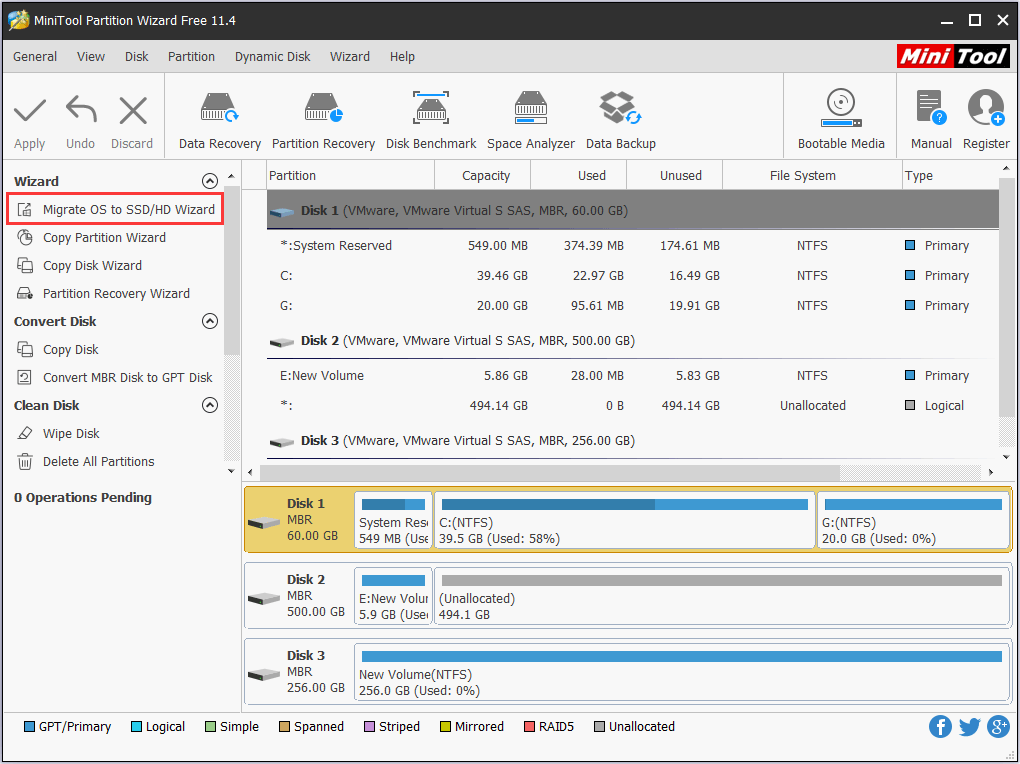
Users who back up Windows operating system do these two things well: first of all, they prepare another hard drive; secondly, they download MiniTool Partition Wizard Free which is compatible with Windows 7/8.1/10 all editions.
MiniTool Partition Wizard FreeClick to Download100%Clean & Safe
MiniTool Partition Wizard Free is professional disk management software that has helped numerous of Windows users deal with their hard drive issues. For example, it helps to address low disk space warning, it is able to resolve New Simple Volume greyed out issue, and plays an important role in SD card formatting. The useful features are too many, and we are not going to cover all of them here.
To back up Windows 10, please follow the steps below.
Step 1. After installing MiniTool Partition Wizard on computer, click Migrate OS to SSD/HD from the tool bar.
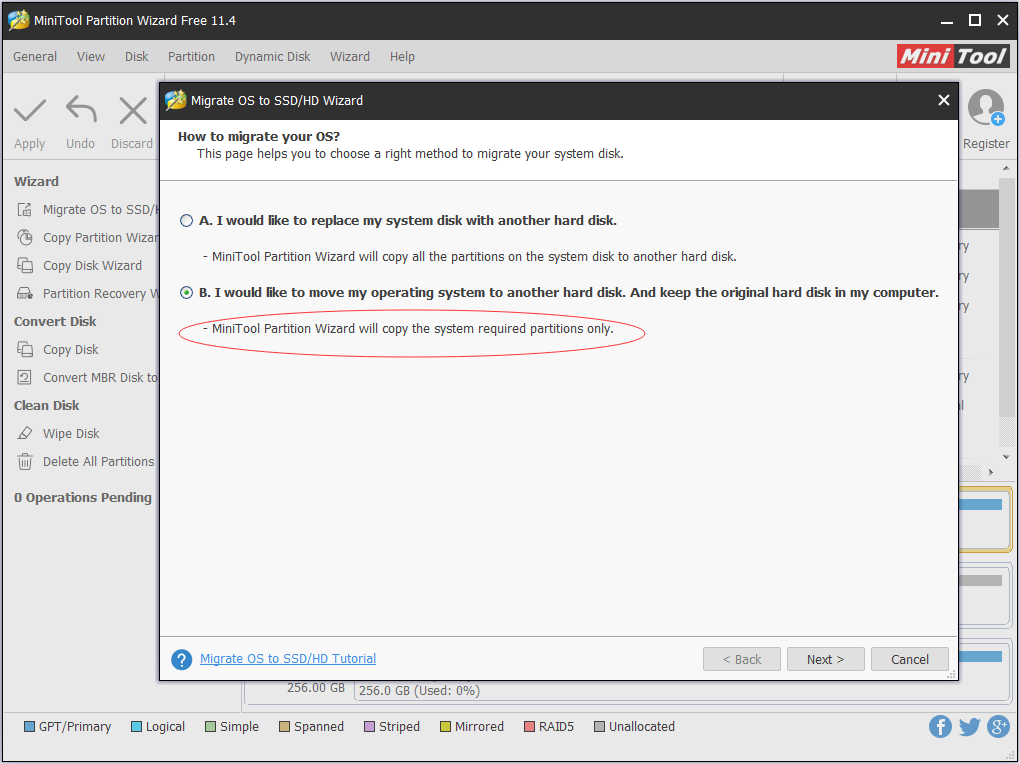
Step 2. MiniTool Partition Wizard will ask you how you would like to migrate your OS. Since we recommend backing up system, choose option B to copy the system required partitions only. Then click Next to continue.
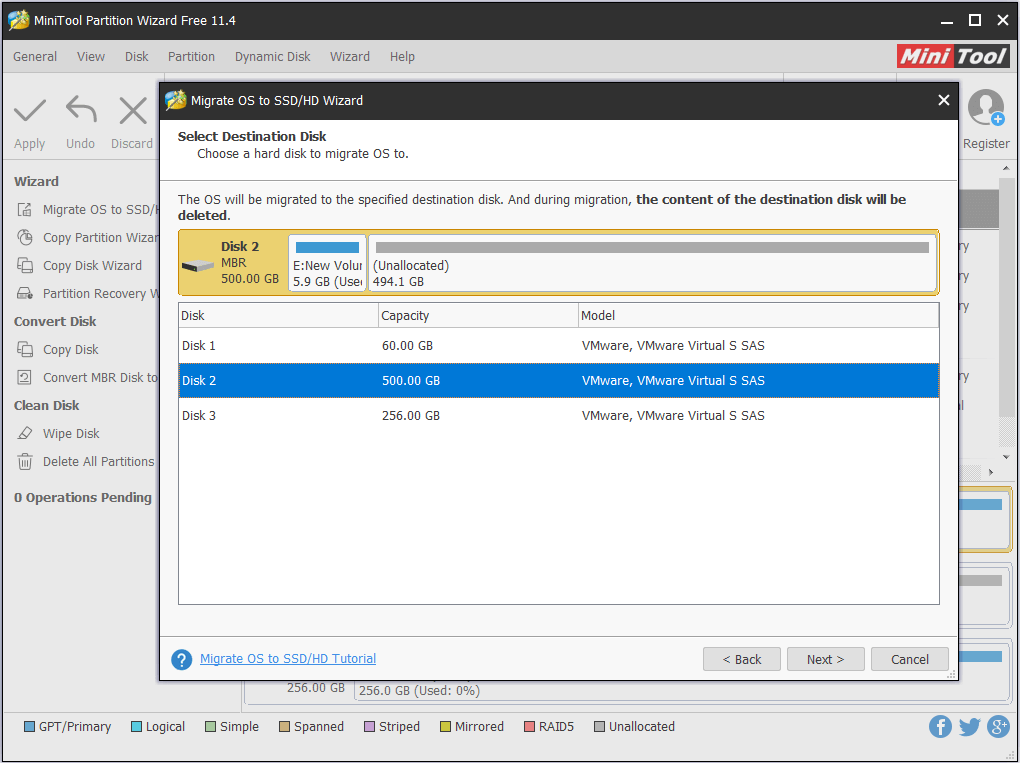
Step 3. Select a destination disk to hold Windows 10. Note that the destination disk should be basic disk and it will be cleaned for a successful system migration. Taking that into account, you had better transfer the important files on the destination disk to another location before you continue this work. When the destination disk is ready for system migration, hit Next to go on.
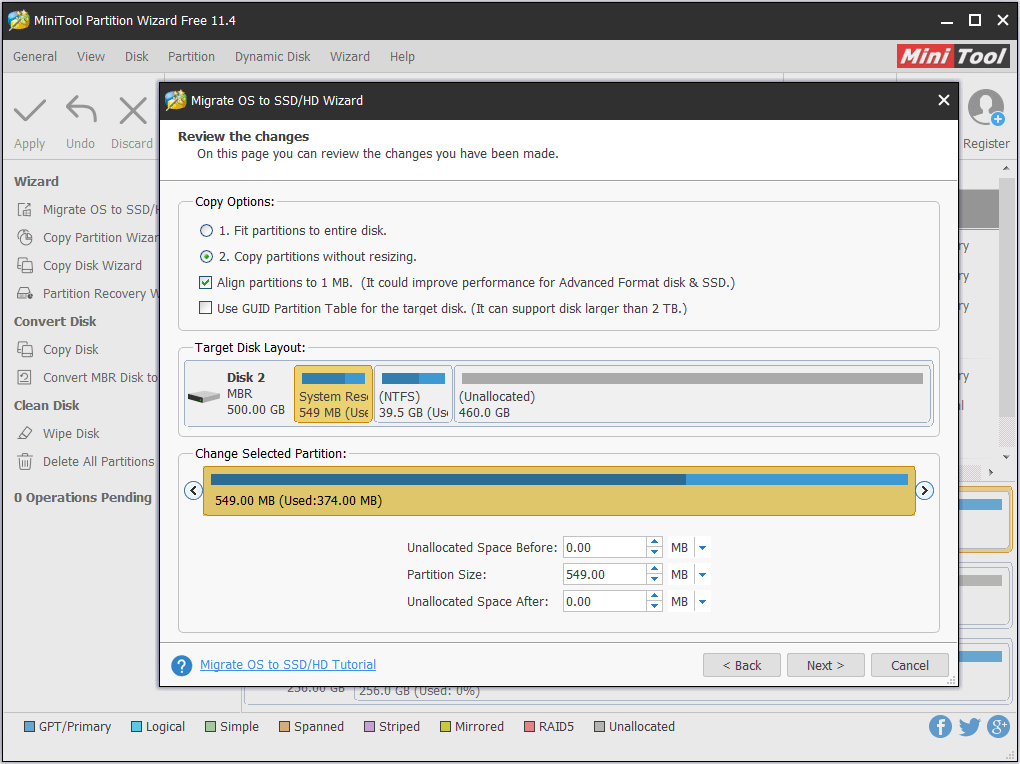
Step 4. On this page, you can preview what is going to happen to your destination disk. Also, you can make some changes to the target disk. Click Next button.
- “Fit partitions to entire disk” is selected by default, but you can also choose “Copy partitions without resize”.
- Please keep “Align partitions to 1MB” checked if your target disk is an SSD or advanced format disk.
- It is worth mentioning that “Use GUID Partition Table” is a paid feature, but you don’t need to pay for this since you are only doing a backup. What’s more, you can resize each partition by dragging the sliding bar.
Step 5. On this page, MiniTool Partition Wizard tells you how to boot from the destination disk. Since you will use this backup copy, you should read it carefully before you click Finish.

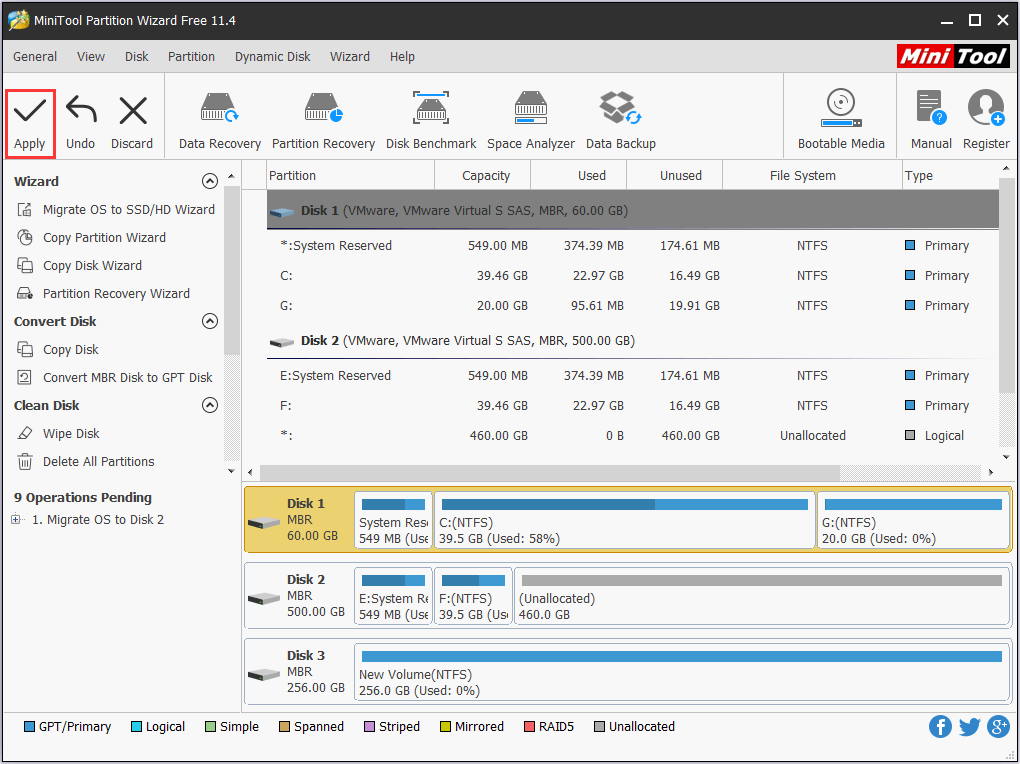
Step 6. Now you are back to the main interface where you can preview the target disk from the disk map. If you agree on this change, click Apply button on the tool bar to start system migration. Your computer will be restarted in order to finish this job.
MiniTool Partition Wizard FreeClick to Download100%Clean & Safe
Now it is time to boot your computer from this backup copy and then roll back Windows 10 to the previous version.
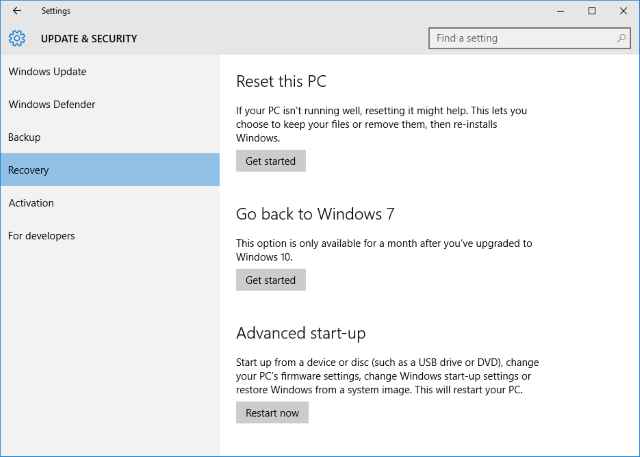
To roll back using the native Windows 10 recovery tool, go to Settings -> Update & Security -> Recovery. Click the “Get started” button under “Go back to Windows 7” or “Go back to Windows 8.1” depending on your previous OS.
The rollback option via Windows.old is available for at most 30 days. If you no longer see the option shown above, you either have passed the valid-date OR you installed a newer version of Windows 10, in which case the respective choice will be “Go back to an earlier build”.
Be aware that the Windows.old backup only allows downgrading to the last version of Windows. If you upgraded Windows 10 from Windows 7, then installed another update of Windows 10, you are only allowed to downgrade to the first edition of Windows 10 instead of going back to Windows 7.
When you have downgraded Windows 10 to the previous version, shout down your PC and set your computer to boot from the original system disk. By doing these, you can continue using the latest Windows operating system and have the chance to use the previous version as well. Now you can delete Windows.old without worries.
More Windows 10 Tips:
- Rollback Windows 10 to Windows 7 or 8.1 after One Month Limit
- How to Free Backup Windows 10 to USB Flash Drive
Bottom Line
Here comes to the end of this post. In this article, we introduce what is Windows.old folder, and how to delete Windows.old files. In addition, we also tell how to use Windows.old to roll back to the previous version of Windows. But if you are satisfied with the new updated system, you can go ahead and just delete it.
And remember, Windows will automatically remove the Windows.old folder a month after you upgrade, anyway.
Now, it is your turn. If this post is proved to be useful, share with friends. If you have any questions or suggestions on this subject, let us know by typing your questions in the comment section. Or you can contact us via [email protected]. Thanks!
About The Author

Position: Columnist
Rodin is an enthusiastic IT writer focusing on Windows trends, disk partition management and data recovery. She loves to write and share her idea about the useful tips and tricks on personal computers' maintenance. If you are looking for methods to improve your computer performance, manage hard drives and recover data from different devices, Rodin can provide reliable solutions for data management.