
Introduction
Marketplaces have played a vital role in the growth of e-commerce. Amazon and eBay are some of the well-known platforms, but in recent years a number of new marketplaces have marked their presence in the eCommerce ecosystem. Etsy is one of the most popular marketplaces for handmade goods and vintage items. Etsy allows people from around the globe to buy and sell unique goods. This platform invites the sellers to showcase their creativity to the new audience, thus, helping them to reach out to potential customers globally. Etsy is a great place to extend the reach of your business. The process of starting a business in the Etsy marketplace is quite easy. Please click on the link below to know more about the rules and regulations of trading: https://www.etsy.com/in-en/sell. Opencart Etsy Marketplace Integration can help you reach your business goals effectively.
KnowBand, an eCommerce plugin, and marketplace integration development company offer the OpenCart Etsy integration module. The Opencart Etsy Marketplace Integrator allows the seller to synchronize their OpenCart store with the Etsy marketplace in a few simple steps. We do understand that being ready to start selling on the Etsy marketplace, it is also important for the store owner to analyze their business method and process so that they can be able to keep up with the new challenges. After starting to sell on multi-channel sellers have to keep proper track of their inventory status, product listings, shipping methods, delivery time, and customer support. To overcome all the major challenges of selling on a marketplace, KnowBand has developed the Opencart Etsy Marketplace Connector.
With the help of the Etsy OpenCart Integration extension, OpenCart store owners can effectively manage the inventory, orders, and shipping for the Etsy shop orders from OpenCart store admin. OpenCart Etsy marketplace integration module offers the following advantages to the sellers:
- Easy installation and user-friendly interface: The user-friendly interface of the OpenCart Etsy Marketplace Integration offers an effortless interface to list the products to the Etsy marketplace.
- Bulk uploading of the products: OpenCart Etsy Marketplace Integrator Module allows the sellers to upload products in bulk. Sellers can create a profile to upload the entire category of the OpenCartstore to the Etsy marketplace.
- Category and product attribute mapping: Sellers can easily map the product attributes and category of the OpenCartstore products with the Etsy store attributes and category via OpenCart Etsy Marketplace Connector Extension.
- Shipping templates: Create shipping templates from the OpenCartstore admin panel and sync these templates to the Etsy shop via OpenCart Etsy Marketplace Integration Plugin.
- Order Management: Manage and keep track of Etsy shop orders from the OpenCartstore admin panel.
- Order status: Admin can update the order status of the Etsy marketplace orders from the OpenCart store admin panel through a cron job.
- Inventory management: Manage inventory for the Etsy store products from the OpenCart admin panel. After making any changes in the product inventory or attributes in the OpenCart store, the admin can easily synchronize the changes to the Etsy marketplace.
- Secondary language: Admin can select a secondary language for the store and easily synchronize it with the Etsy marketplace shop through a cron job.
2.0 Installation
After purchasing the module, you will get the following files as below:
1. zip (contains the source code of the module)
2. User Manual
Follow the following steps to install the extension:
- Unzip the zip file. It would contain files and folders as shown below –

2. Copy all the files and folders of the unzipped folder into the root folder of the website.
3. Now module is ready to be installed on your store and you can find that in Store Admin -> Modules and Services. It would be shown as below –

3.0 System Setup
Before proceeding ahead, it is important to know the correct flow of actions to set up this system as several things are dependent on other things. If we do not take care of them then it would become difficult to process smoothly or it may be error-prone.
- Seller account setup: This section will help you to set up the shop on the Etsy marketplace and in the next steps you will learn about the Etsy API key. Etsy API key and API Secret are required to integrate the Opencart and Etsy marketplace.
- Admin Interface: This section will help you to understand the complete working of the Etsy Opencart Integration plugin.
4.0 Etsy Marketplace – Seller Account Setup
To start selling on Etsy Marketplace you need to have a seller account on Etsy. In this section, we are listing all the steps to create a seller account on Etsy. Please find them below –
- Go to the link – https://www.etsy.com
- Click on the “Sell on Etsy” button present at the top right corner.
- Click on the “Register” button on the page you are visiting now. Refer to the screenshot given below.

- Fill up the registration form and click on the “Register” button. It would create your seller account and send a verification email to the provided email address.

- Now, it would also redirect you to another page as shown below.

5. Now, it is asking to set up your shop preferences. Complete all the highlighted sections – Shop Preferences and Name your shop, Stock your shop, how you will get paid, and Set up Billing.
5.0 Etsy Marketplace – Setup an App
To start communication between OpenCartStore and Etsy Seller Account, you need to create an App on Etsy Marketplace. Following are the steps to create an App on Etsy –
- Go to the link – https://www.etsy.com/developers/register
- It would open a page where a form will be shown with a few input fields as shown below.

- Fill up the form and click on “Read Terms and Create App”. Please make sure that you left the “Inventory Management Compatibility” checkbox is checked.
- It would ask to accept “terms and conditions”. Accept and click on the “Create App” button.
- It would register your App on Etsy Marketplace and provide API details as shown below.

Note: “The term ‘Etsy’ is a trademark of Etsy, Inc. This application uses the Etsy API but is not endorsed or certified by Etsy, Inc.”
6.0 Admin Interface
Opencart Etsy Marketplace connector is easy to configure. The configuration settings can be managed via the admin interface. After installation, the store admin can find the “Etsy” module in the Extension List under the “Extensions” tab.
The Etsy integration extension will display as shown below:

On clicking the Edit button next to the Etsy module, it will redirect to the admin interface. Here admin can see all the options to configure the Etsy module:

Etsy Marketplace extension offers the following options –
- General Settings
- Profiles
- Attribute Mapping
- Shop Section
- Shipping Templates
- Products
- Orders
- Synchronization
- Audit Log
Each tab is explained below.
6.1 General Settings
You can find the screenshot of the “General Settings” page below –

General Settings tab is there for capturing details of Etsy Marketplace API like API Key, Host, etc. This helps the admin to connect the OpenCart store with the Etsy marketplace. Please find the description of each input field below –
1. Enable/Disable
Admin can Enable/Disable Opencart Etsy Marketplace Integration by using this option. If enabled, then only this module and all its settings will be working otherwise there will be no impact of this module on the store.
2. Etsy API Key
Enter Etsy API Key which will authenticate the connection being established between OpenCartstore and Etsy Marketplace.
3. Etsy API Secret
Admin needs to enter Etsy API Secret mandatory for authentication between OpenCartstore and Etsy Marketplace.
4. Etsy Currency
Admin can select the Etsy currency from the menu.
5. Select your Etsy default language:
Admin can select the Etsy default language from the menu.
6. Select additional languages to sync:
Admin can select additional languages to sync with the Marketplace.
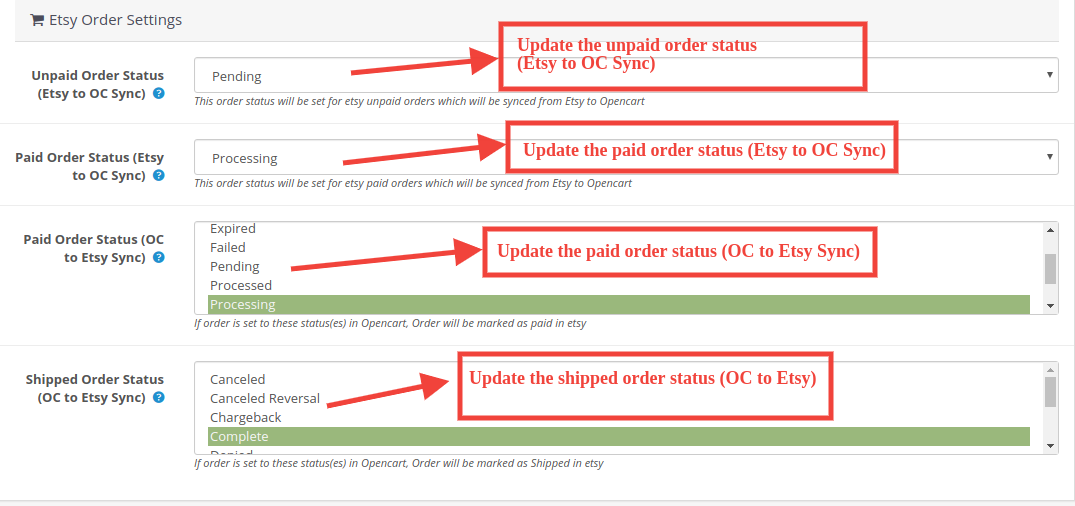
6.1.1 Etsy Order Settings:
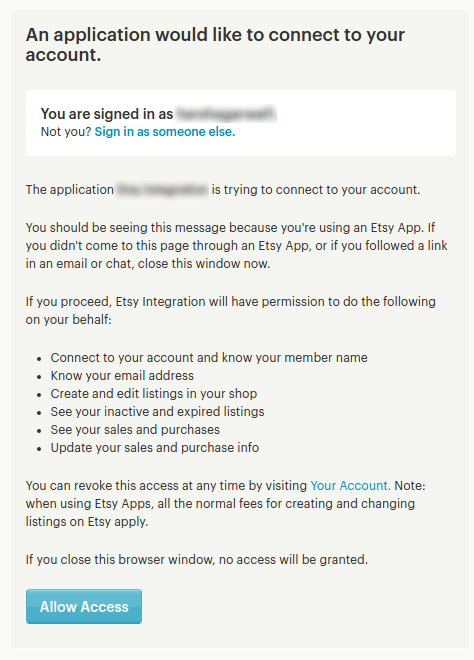
After providing these details, click on the “Save” button in the top right corner. It would redirect the admin to the Etsy Marketplace to allow the App Access for the store. Click on the “Allow Access” button as shown below and it would establish the connection between the store and Etsy Marketplace.
It would also redirect the admin back to the same page of “General Settings” and show the “Disconnect” button as the connection has now been set up with Etsy Marketplace.
6.2 Profiles
The profile Management tab provides options to create the profile for product listing. In this section, the admin will be able to map OpenCart store product attributes and categories to Etsy Marketplace. Opencart Etsy Marketplace Connector allows the seller to select multiple store categories to sync with the one Etsy category.

Admin needs to enter all the mandatory details as per the instructions are given in the below screenshot. After entering all the details click on the Save button at the top of the form.

6.2.1 How to add New Profiles?
Following are the steps to add new profiles-
- Go to the Etsy Marketplace module-> Profiles(Menu Option)
- It would redirect admin to a page where already added profiles will list (If any). Click on the “+” (plus icon as shown in the screenshot below) and it would redirect admin to a new page where a form with some input fields will be shown.
- Fill up the following input fields –
- Profile Title: Enter the Profile Title as per your choice.
- Etsy Category (List of Etsy Marketplace categories): Select the correct category from the drop-down list.
- Store Category (Lists of Store Categories): Select the OpenCart store category for the products. The selected category will be mapped with the Etsy category (as selected in the Etsy Category) field.
- Select Shop Section: Select the shop section from the drop-down list.
- Shipping Template (List of Shipping Templates): Select the shipping template from the drop-down list.
- Is Customizable?: Select from the drop-down list.
- Who Made: Select from the drop-down list.
- When Made: Select from the drop-down list.
- What is it?: Select from the drop-down list.
- Recipient: Select from the drop-down list.
- Occasion: Select from the drop-down list.
- Price Type: Select from the drop-down list.
- Price Management: Select from the drop-down list.
6.2.2 How to Edit/Delete Profile?
Admin can easily update the profile entries; the Opencart Etsy Marketplace Connector allows the admin to sync the changes to the Etsy shop in simple steps. Following are the steps to edit/delete profile from the system –
1. Go to the Etsy Module -> Profiles (Menu Option)
2. Click on the “Edit/Delete” button is given corresponding to each profile as shown in the above screenshot.
3. If an admin has clicked on the “Edit” option, then, it would redirect the admin to a new page where a form with some already filled input fields will be shown. Admin can simply update values and save the details by clicking on the “Save” button.
4. The admin can click on the “Delete” option to delete the selected Profile from the system.
6.3 Attribute Mapping

This option helps to upload the Variation products. Select the correct attribute and save it.
6.4 Shop Section

Under this tab, the admin can view the shop sections and their titles. You can edit, delete the existing profile while you can add the new shop section too from the top right corner. You will be directed to the window below. The same window will open for editing the shop section with filled details.

6.5 Shipping Templates
The shipping Templates tab is there to manage shipping options. In this section, the admin can create Shipping Templates along with other options for the existing shipping template like Add Shipping entry, View shipping entry, Edit Shipping Template, and Delete. Admin can create multiple shipping templates by using the EtsyOpenCart Integration module. Please refer to the next screenshot:

Admin can easily modify the existing shipping template or add new shipping templates. After creating new shipping templates, the store admin must sync the shipping templates to the Etsy shop by clicking the “Shipping Template Synchronization” option under the “Synchronization” tab.
6.5.1 How to add Shipping Templates?
Following are the steps to add a Shipping Template into the system –
- Go to the Etsy Marketplace -> Shipping Templates (Menu Option)
- It would display the page where already added Shipping Templates will list (If any). Click on the “+” (Plus Icon – as shown in the above screenshot).
- It would redirect the admin to the new page where a form with some input field will be shown (Screenshot is shown below).
- Fill up the following input fields of form –
- Shipping Template Title: Enter the shipping template title as per your choice.
- Origin Country: Select the origin country from the drop-down list.
- Primary Cost: Enter the primary shipping cost for the shipment.
- Additional Item Cost: Enter the additional item cost for shipment. It is the additional cost if the customer adds a second product to the package.
- Min. Processing Days: Enter the minimum processing days. This field accepts only numeric values.
- Max. Processing Days: Enter the minimum processing days. This field accepts only numeric values.
Click on the “Save” button to add the new shipping template.
You can find the screenshot of the “Add New Shipping Template” form below –

6.5.2 How to Edit/Delete Shipping Template?
Following are the steps to edit/delete Shipping Template from the system –
1. Go to the Etsy Marketplace -> Shipping Templates (Menu Option)
2. It would display the page where already added Shipping Templates will list (If any). Click on the “Edit/Delete” buttons corresponding to each Shipping Template.

3. Admin can update the values as per the requirement and save the details by clicking on the “Save” button.
4. If an admin has chosen the “Delete” option then it would delete the Shipping Template and all its Shipping Template Entries from the system.
Admin can modify the shipping template details by using the Edit option. After making the changes in the shipping template details, the admin needs to save the changes and synchronize the shipping templates with the Etsy marketplace.
6.5.3 How to Edit/Delete Shipping Location of a Shipping Template?
The shipping Entry tab of the Etsy OpenCart module allows the admin to define the destination country and the standard shipping cost for the selected destination. Admin can create only one shipping entry for a particular destination (country/region). Following are the steps to view the Shipping Template location into the system –
1. Go to the Etsy Marketplace Connector module -> Shipping Templates (Menu Option)
2. It would display the page where already added Shipping Templates will list (If any). Click on the “+” button given corresponding to each Shipping Template listed.
3. It would display the page as the screenshot given below:

- Shipping Template Title: Enter the shipping template title.
- Origin Country: Select the country of origin.
- Destination Type: Select the country of destination for the shipping template.
- Destination Country: Select the destination country.
- Primary Cost: Enter the Primary Cost.
- Additional Item Cost: Enter the additional item cost.
6.6 Products
In the Etsy OpenCart integration extension after creating the profile, the admin needs to sync the products which are selected in the profile to the Etsy marketplace. Admin can also check the status of the listed products from the OpenCart store admin panel. The product listing tab of the Etsy Marketplace Integration shows a list of all the products that are to list on Etsy Marketplace with their status and values as shown in the screenshot below –

Please note that after creating a profile the admin must click on the “Product Synchronization” option under the “Synchronization” tab of the Etsy module to list the selected products to the Etsy marketplace. Admin can click on the Revise/Relist button to activate it on the Etsy Marketplace. Admin can also delete the product listing by clicking on the “-” button.
6.7 Order Settings
The order Settings tab is there for mapping store order status with Etsy Marketplace order status which will be used during capturing orders from Etsy Marketplace. The screenshot below will show you the order listings and the admin can also create a filter to search for a particular order.

6.5.1 How to view Order Details and Status?
Following are the steps to map order status –
- Go to the Etsy Marketplace Integration module -> Orders (Menu Option)
- It would display a page the same as shown in the above screenshot.
- Click on the View Button given below the “Action” tab.
- It would display the page with all the Order details as shown below.

6.8 Synchronization
All tabs defined above are basically for saving the settings and options into the system which are used during synchronization between OpenCart Store and Etsy Marketplace. There are the following jobs to synchronize content between OpenCart Store and Etsy Marketplace which you can find below –

6.8.1 How to sync products locally?
Following are the steps to synchronize sync products locally on Etsy Marketplace –
1. Go to the Etsy Marketplace ->Synchronization (Menu Option)
2. It would redirect admin to a new page where all synchronization actions list as shown in the above screenshot.
3. Click on the “Sync Now” button shown below.

This action will sync the products from the OC to the module (Without syncing the products on Etsy). If you want to disable any products (don’t want to sync on Etsy), click on the ‘Sync Now’ & disable the products in the Product Listing Tab. Disabled products will not be synced on Etsy.
6.8.2 How to Sync New Products on Etsy Marketplace?
Following are the steps to get Countries and Regions from Etsy Marketplace –
1. Go to the Etsy Marketplace Integration module->Synchronization (Menu Option)
2. It would redirect admin to a new page where all synchronization actions list as shown in the above screenshot.
3. Click on the “Sync Now” button shown below.

This action will sync the new products into Etsy. Click on the ‘Sync Now’ to sync the products manually. Set this CRON in your hosting CRONTAB to run every hour to sync the products automatically
6.8.3 How to sync Updated Products on Etsy Marketplace?
Following are the steps to synchronize Products Listing on Etsy Marketplace –
1. Goto the Etsy Marketplace Integrator module -> Synchronization (Menu Option)
2. It would redirect admin to a new page where all synchronization actions list as shown in the above screenshot.
3. Click on the “Sync Now” button shown below.

If any listed product info has been updated in the Opencart then Run this CRON to update the product info on Etsy. Click on the ‘Sync Now’ to sync the products manually. Set this CRON in your hosting CRONTAB to run every 2hour to sync the products automatically.
6.8.4 How to sync Products Status on Etsy Marketplace?
Following are the steps to synchronize Products Variations Listing on Etsy Marketplace –
1. Goto the Etsy Marketplace Integration module -> Synchronization (Menu Option)
2. It would redirect admin to a new page where all synchronization actions list as shown in the above screenshot.
3. Click on the “Sync Now” button shown below.
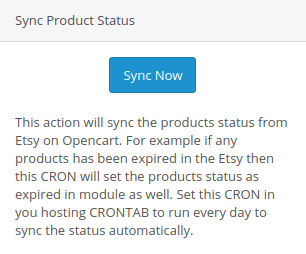
This action will sync the status of the products from Etsy on Opencart. For example, if any products have been expired in Etsy then this CRON will set the status of the products as expired in the module as well. Set this CRON in your hosting CRONTAB to run every day to sync the status automatically.
6.8.5 How to Synchronize orders from Etsy Marketplace?
Following are the steps to synchronize Products Variations Listing on Etsy Marketplace –
- Goto the Etsy Marketplace Integration module -> Synchronization (Menu Option)
- It would redirect the admin to a new page where all synchronization actions are listed as shown in the above screenshot.
- Click on the “Sync Now” button shown below.

This action will sync the orders from Etsy to Opencart. Click on the ‘Sync Now’ to import the orders from Etsy to Opencart. Set this CRON in your hosting CRONTAB to run every hour to sync the orders from Etsy to Opencart automatically.
6.8.6 How to update Orders Status on Etsy Marketplace?
Following are the steps to update the status of orders on Etsy Marketplace –
1. Goto the Etsy Marketplace Integrator module -> Synchronization (Menu Option)
2. It would redirect admin to a new page where all synchronization actions are listed as shown in the above screenshot.
3. Click on the “Sync Now” button shown below.
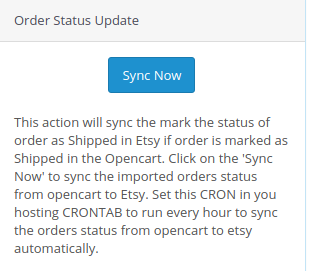
This action will sync the mark the status of order as Shipped in Etsy if the order is marked as Shipped in the Opencart. Click on the ‘Sync Now’ to sync the status of the imported order from OpenCart to Etsy. Set this CRON in your hosting CRONTAB to run every hour to sync the status of the order from OpenCart to Etsy automatically.
6.9 Audit Log
The audit log helps the admin to keep track of all the tasks performed. Please refer to the attached screenshot below.

Product Video:
Click here for the module link.
Click here for the Admin Demo.
You can also find this module directly on OpenCart Store too. Click here for the link.
