
Magento multi-vendor Marketplace module by Knowband is one of the easiest ways to transform your eCommerce site into a thriving Multi vendor marketplace. A Multi vendor marketplace is an online space where different sellers and vendors can list their products, manage their inventory and sell at the same platform. The Magento Multi vendor marketplace plugin converts your online shop into a fully functional online marketplace.
1.1 Features offered to the store admin by Magento Multi-vendor Marketplace extension:
- The admin can approve/reject the seller’s profile with the help of the Magento marketplace plugin.
- The Magento marketplace module makes it easier to set and manage the commission charged to the sellers.
- The admin can add/remove the products from the back-end of the Magento marketplace multi-vendor module.
- The store admin can create and manage the product categories from the back-end of the Magento marketplace extension.
- The Magento store owner can track the transaction and earn at the button click.
- The Magento marketplace multivendor is compatible with the latest Magento version and supports all themes.
- The admin can approve/reject product and seller reviews from the backend of Magento Multi seller Marketplace plugin.
- Email templates offered by the Magento Multi-vendor Marketplace module can be used by the admin to notify the sellers.
- Store admin has the access to approve or disapprove the seller vacation request from the backend of Magento Multi seller Marketplace module.
1.2 Features offered to the seller by Magento Multi-vendor marketplace extension:
- The Magento Multi-vendor marketplace allows the sellers to register from the front end of the online marketplace.
- The sellers can easily map the categories from the seller dashboard.
- Also, the sellers can request including a new category to keep the products. The marketplace admin can approve/reject the category request with the help of the Magento multi-vendor marketplace plugin.
- The seller’s dashboard makes it easier for them to track and manage their products, profile as well as sales.
- Magento multi-vendor marketplace allows the sellers to add sale banners, shop logo and custom HTML content. These banners will be displayed on Seller’s Page with separate product collection.
- Sellers can send the payout requests and Vacation request to the admin from the seller dashboard.
- Sellers can generate coupons from the seller dashboard to lure the customers and enhances the chances of conversion.
- Sellers can display the Upsell and Cross-Sell products at the product page and checkout page to enhances the sale.
- To distinguish taxable and Non- taxable items, sellers can add the products in different tax classes.
1.3 Customer Benefits offered by Magento Multi-vendor Marketplace:
- The Magento multi-vendor marketplace extension allows multiple sellers/vendors to sell their products on the same platform. Thus, customers can choose the perfect product from a wide assortment.
- Magento marketplace extension allows the customers to shop the products at competitive prices.
- The customers can send product reviews. These reviews can be approved/disapproved from the back-end of the Magento marketplace plugin.
- Online shoppers can review the sellers. The seller reviews can be monitored from the back-end of the Magento multi-vendor marketplace module.
- The Magento multi seller marketplace module even offers an option with the help of which the buyers can become a seller.
- Customers can directly contact the sellers from the frontend of the store. A ticket will be generated every time a customer contacts the seller.
2.0 Steps For Installation of Magento Multi-Vendor Marketplace
Follow the following steps for installing Magento MarketPlace extension:
- Download the Magento Multi-vendor Marketplace extension package.
- Unzip the package on your root folder of Magento setup via FTP manager (like Filezilla or WinSCP – download here: https://filezilla-project.org/).
- In Admin Panel you will see a new Menu Market Place next to the System menu. In case you are not able to see the link under System, please clear Magento Cache first then check again.
- With this, the Magento multi-vendor marketplace extension gets installed on your system.
3.0 Admin Panel
In the admin panel of Magento Multi seller, marketplace extension adds a separate menu (named MarketPlace) right next to the system menu and also adds a new tab to the customer create/edit page.
3.1 Register as Seller Option (Add New Customer Page)
If the admin is creating a new Customer from the admin side then a new tab appears on that page asking for the Register as Seller field.
The Path to the Customer page:
Go to Customers -> Manage Customers and Click on Add New Customer on the right side of the page.
The admin can set the field to Yes to register the customer as a seller. By default, the field is set to No.

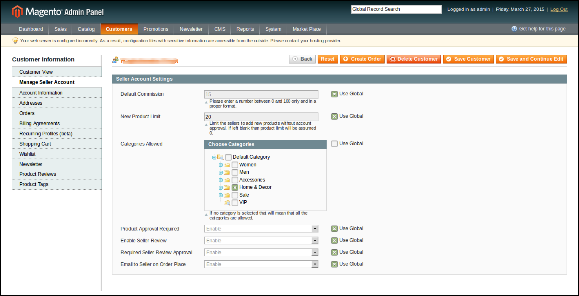
3.2 Manage Seller Settings (Customer Edit Page)
In case of editing a customer if the customer is also a seller than a new tab (named Manage Seller Account) appears to change the seller level settings for the current customer who is a seller as well.
Path to the above page:
Go to Customers -> Manage Customers and click on any customer who is also a seller.
The settings are stored when the admin submits the edit form for the customer.
When this page loads for the first time the fields are filled with the default settings pre-defined for the extension.
4.0 Marketplace Menu
The Magento marketplace extension consists of a total of 15 sub-menu options which redirect to several pages for the Magento multi-vendor marketplace Extension.
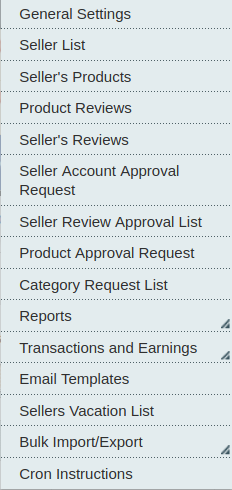
Some of the menu options of the Magento multi-vendor marketplace module have further sub-menus to navigate to some of the related pages.
All the 15 configuration options offered by the Magento multi-vendor marketplace plugin are described below in details:
4.1 General Settings
The General settings tab of the Magento multivendor marketplace module is divided into 2 main levels i.e. Seller Level Settings and Global Level Settings. This page only controls the Global level settings for the Magento Marketplace Extension.
This page has all the settings that control the Magento Marketplace plugin and its several features.
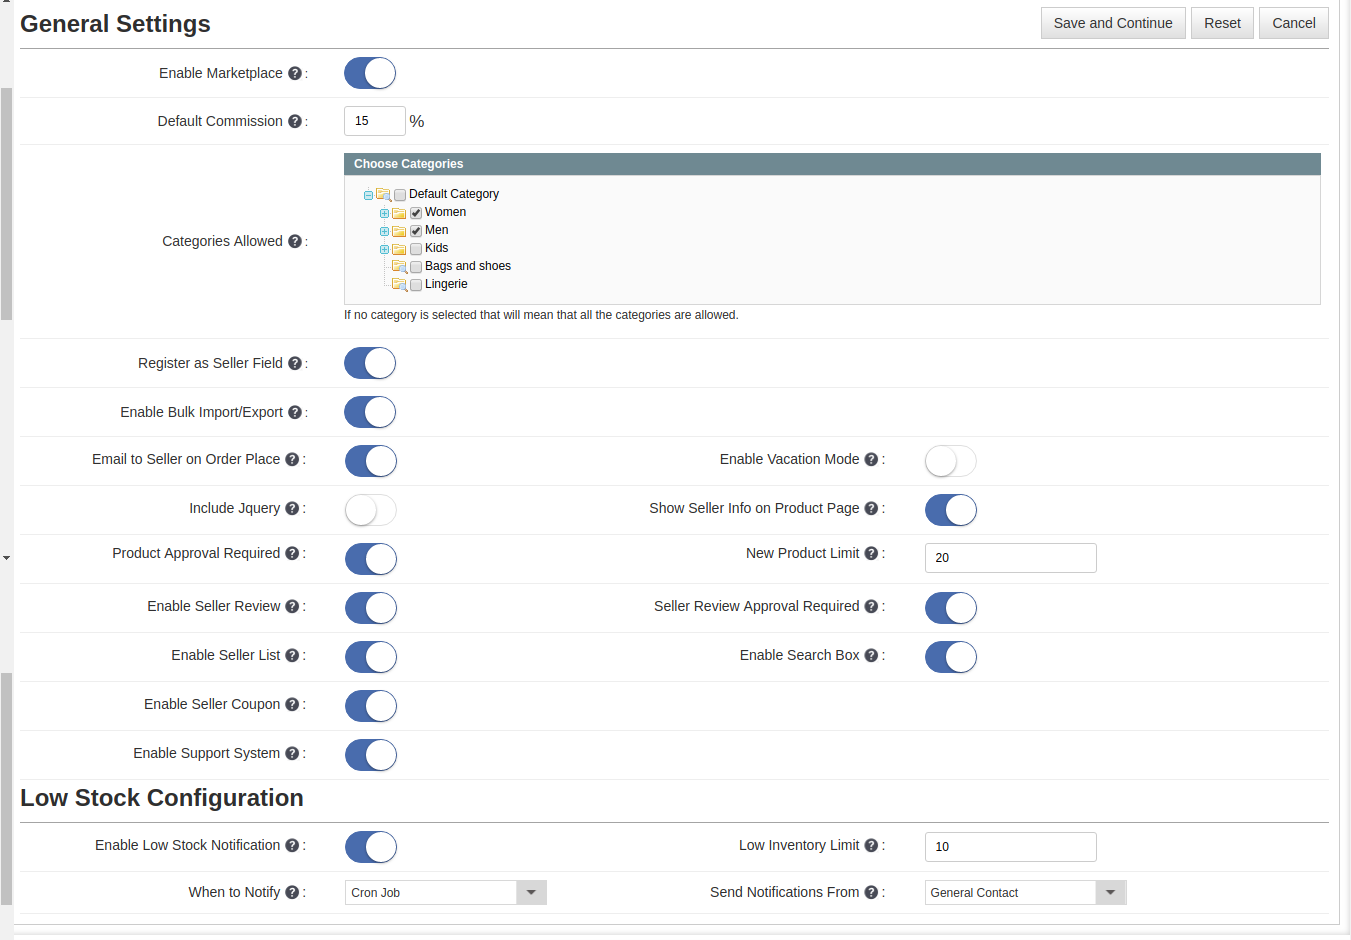
The general settings page of Magento multi-vendor marketplace plugin consists of the following fields:
1. Enable Marketplace: Enables or Disables the Magento Multi-vendor Marketplace extension on the storefront. If disabled, no page or feature of the extension is accessible on the storefront.
2. Default Commission: Sets the default commission percentage that is taken by the store owner from the total sale made by the seller.
3. Categories Allowed: The categories that are allowed for the sellers to add products. If no category is selected then all the categories are allowed and if some of the categories are selected that means that only the selected categories are allowed.
4. Register as Seller Field: Enables or Disables the Register as Seller field on the Create Account page of the storefront.
5. Enable Bulk Import/Export: Enable the button to allows the third-party vendors to use bulk import/export feature.
6. Email to Seller on Order Place: Enable this field to send an email to the seller in case an order is placed for the sellers’ product(s).
7. Include JQuery: Disable this field in case JQuery is already included in the front by another plugin or your theme.
8. Product Approval Required: Enable this field in case approval for the product added by any seller is required before it gets to your store.
9. Enable Seller Review: Enable this field in case you want the customers can review the seller.
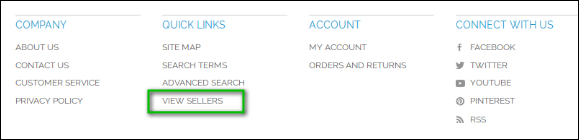
10. Enable Seller List: Enable this field in case you want to show a link in the footer of the storefront to the seller listing page. If this setting is disabled then the seller listing page cannot be accessed anyhow.
11. Enable Vacation Mode: Enable this button to allow the sellers to set the vacation mode for their shop for a particular period.
12. Enable seller Coupon: Enable this feature to allow the sellers to generate coupons for their products.
13. Show Seller Info Product Page: Enable the button to show the seller’s info on the product page.
14. New Product Limit: Enter the maximum number of products that a new seller can add before the seller account is approved.
15. Seller Review Approval Required: Enable this field in case you want the seller review to be approved before it becomes visible in the storefront.
16. Enable Search Box: Enable this field in case you want a search box on the seller listing page to search the sellers.
17. Enable Support System: Once this feature is enabled from the backend of the Magento Multi seller Marketplace module, the customer can directly contact the seller.
Low Stock Configuration

1. Enable Low Stock Notification: Enable the button to notify the sellers regarding the low stock notification.
2. Low Inventory Limit: Enter the stock level below which the seller will be notified regarding low stock.
3. When to Notify: Select when you will send the notification. It may be sent when the order is placed or after executing cron.
4. Send Notification From Select the email ID from which you want to send the notification.
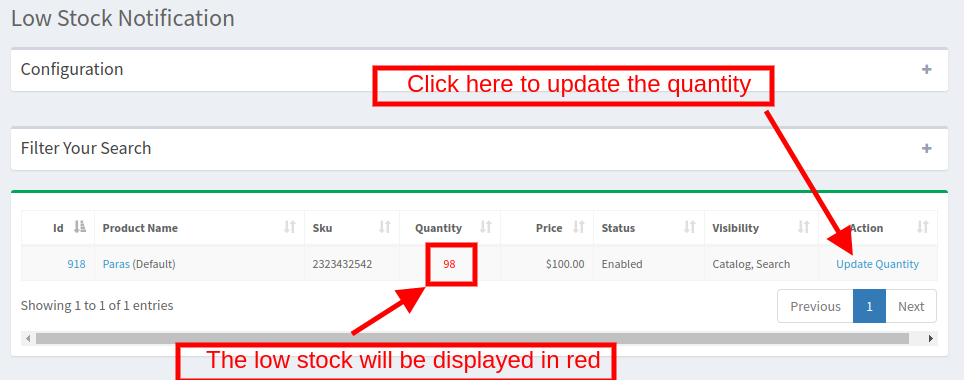
Once this functionality is enabled from the back-end of the Magento Marketplace module, the vendors can configure the low-stock setting from the Low-stock section of their dashboard.
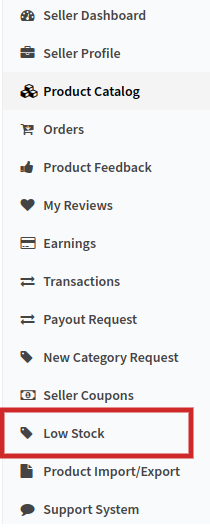
Go to the configuration section of the Low Stock tab of the dashboard.
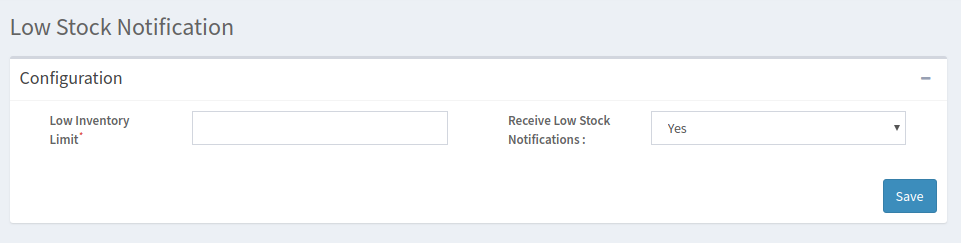
Low Inventory Limit: The sellers can enter the inventory limit below which they want to get notified.
Receive Low Stock Notification: Select whether you want to receive the low stock notification or not.
4.2 Seller List
This page of the Magento marketplace extension has a list of all the sellers that are approved by the store owner.
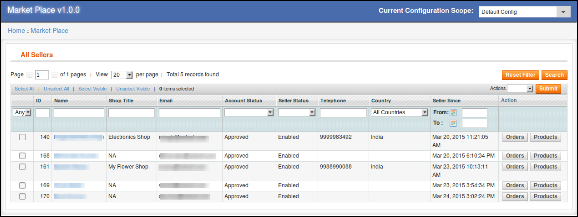
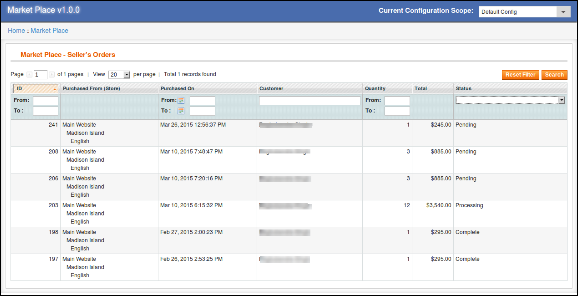
The above list contains a list of all the sellers that are approved. There are buttons to go to the seller’s products and orders in front of each seller.
When you click on the Orders button than a new page opens consisting of the list of all the orders for that particular seller opens.
When you click on the Products button than a new page opens consisting of the list of all the products for that particular seller opens.

The is also a feature to enable or disable any seller using the Mass Actions feature of the Grid. To enable/disable any seller select the seller(s), choose the action (i.e. Enable or Disable) then click on the submit button to complete the action.
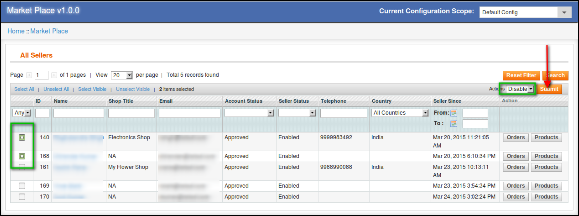
If a seller is disabled then all the products of that seller are also disabled and will not be visible at the storefront.
4.3 Sellers Products
This page of the Magento multi-vendor marketplace extension consists of all the approved products added by the seller(s) to the store.
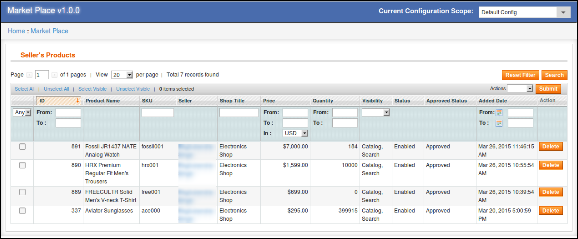
If the settings (i.e. Product Approval Required) is disabled, then, a product is approved directly when it is added by the seller and appears in this list. Otherwise, the product first appears in the Product Approval list.
Delete Product: To delete a product, you have to click on the delete button in front of that product.
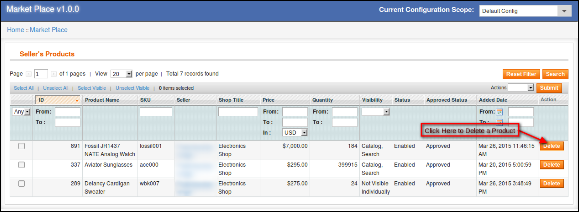
A pop-up will appear asking for the reason for the deletion of the product. To complete the action fill the reason and click submit.
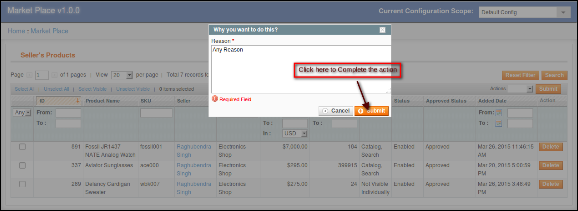
A mail will be sent to the seller to notify the deletion of the product. The mail also contains the reason you provided for the deletion of the product.
Note:- The product delete action cannot be undone. Please use this feature carefully.
Enable/Disable Product: To change the status of any product, you have to use the Mass Action feature of the Grid. To enable/disable any product select the product(s), choose the action (i.e. Enable or Disable), then, click on the submit button to complete the action.
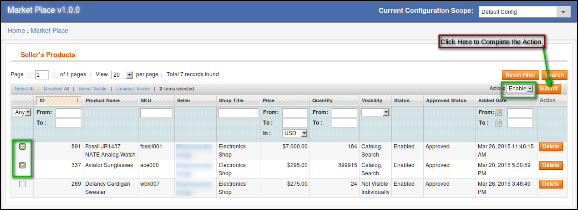
Note:- Once a product is disabled from the back-end of the Magento Multi-vendor Marketplace plugin, it will not be visible at the front. Avoid disabling products, only disable a product if it is very necessary.
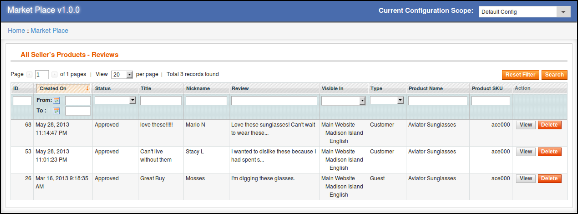
4.4 Product Reviews
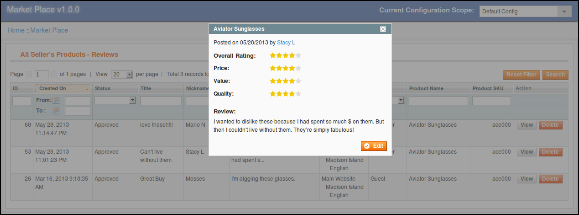
This page of the Magento multi seller marketplace extension contains a list of all the reviews done by customers on the seller’s products.
View Product Review: Most of the details of the product review are already mentioned in the grid but some of them are not. To view, all the details of any Product Review click on View Button in front of that review. A pop-up will appear in the back-end of the Magento multi-vendor marketplace plugin having all the details of the product review.
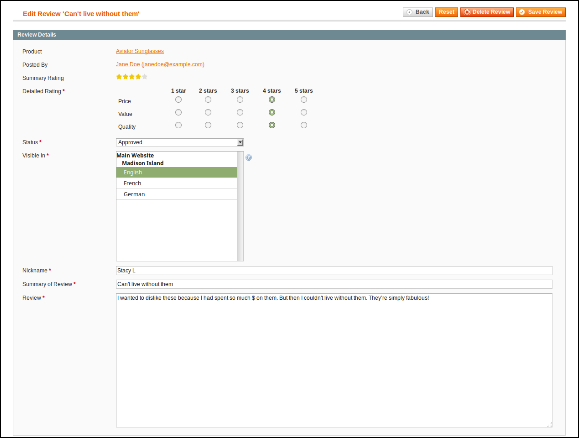
To edit the review you can click on Edit Button on the pop-up that will redirect you to the edit review page.
Delete Product Review: The Magento multi-vendor marketplace extension allows the store admin to delete the product reviews. To delete a product review, you have to click on the delete button in front of that product review on the list.
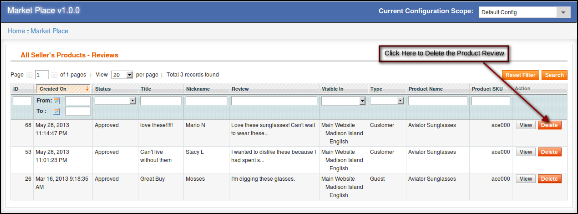
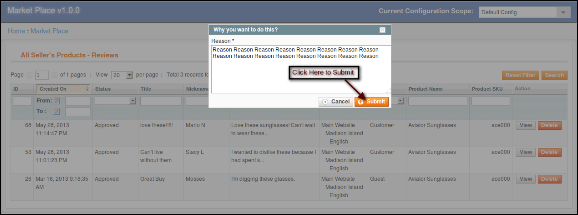
A pop-up will appear asking for the reason for the deletion of the product review. To complete the action fill the reason and click submit.
Note:- The product review delete action cannot be undone. Please use this feature carefully.
4.5 Sellers Reviews
This list contains a list of all the Sellers Reviews done by customers in the store.
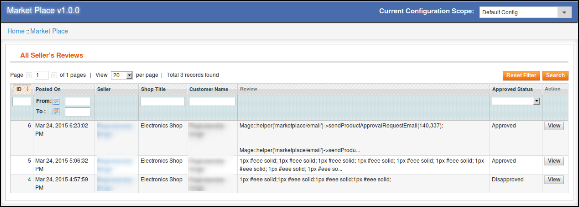
If the settings (i.e. Seller Review Approval Required) is disabled then a seller review is approved directly when it is added by the customer and appears in this list. Otherwise, the review first appears in the Seller Review Approval list.
Note:- The Seller Reviews that are disapproved by the store owner also appear in this list.
View Seller Review: To view all the details of a seller review you have to click on the View button in front of that review in the list.
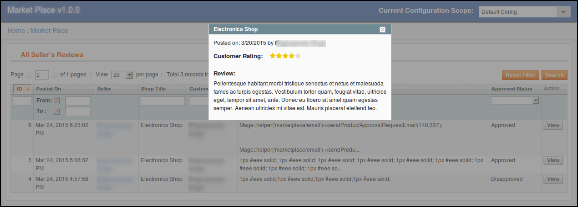
On clicking the View button a Pop-up will appear having all the details of the corresponding seller review.
4.6 Seller Account Approval Request
When a seller registers as a seller on your store than it first appears in this list of the Magento multi-vendor marketplace extension as shown in the image below. Then it is up to the store admin to approve or disapprove the seller account request.

Approve Seller Account: To approve a seller account, you have to click on the Approve button in front of that seller on the list.
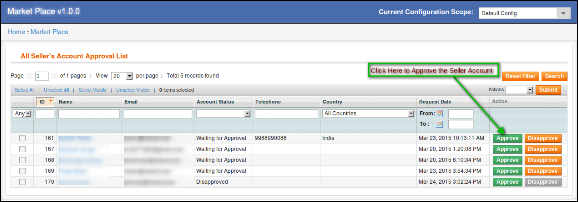
Once the Seller account is approved, it directly moves to the Sellers List and all the limits to the seller account are released.
A mail will be sent to the seller to notify the approval of the seller account.
Note:- The Seller Accounts that are approved by the store owner cannot be undone. Please use this feature carefully.
Disapprove Seller Account: To disapprove of a seller account, you have to click on the Disapprove button in front of that seller on the list.
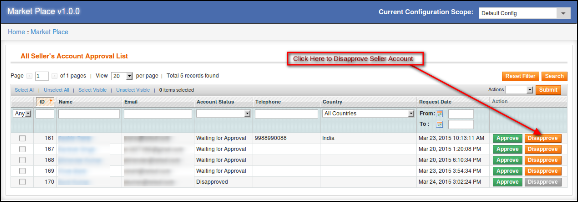
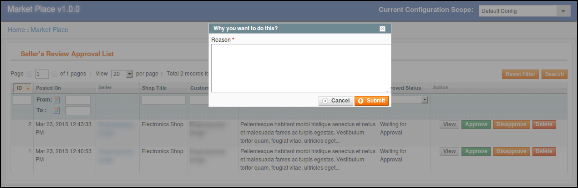
A pop-up will appear asking for the reason for the disapproval of the seller account. Fill the reason and then submit the form to complete the action.
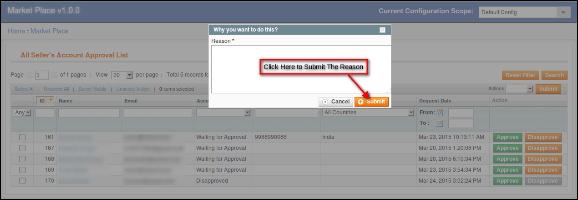 A mail will be sent to the seller notifying the disapproval of the seller account. The reason provided in the pop-up will also be sent in this mail.
Note:- Once a seller is disapproved then he can again apply for the seller account and whenever a seller do this the store owner is notified through a notification email.
4.7 Seller Review Approval List
This list of Magento multi-vendor marketplace contains all the Seller Reviews that are just posted by the customers and no action is taken on them.
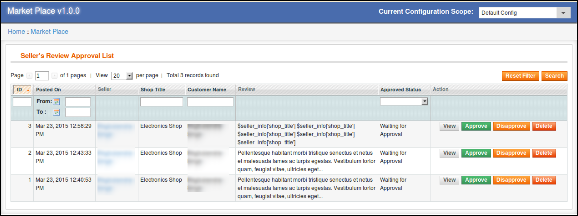
If the settings (i.e. Seller Review Approval Required) is enabled then only any seller review posted by any customer appears in this list otherwise it directly appears in the Seller Reviews list.
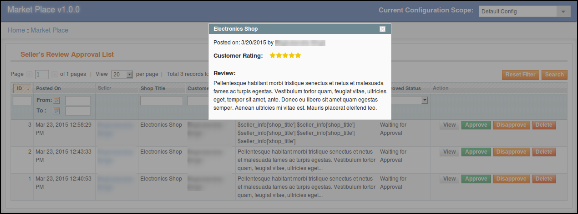
View Seller Review: To view all the details of a seller review you have to click on the View button in front of that review in the list.
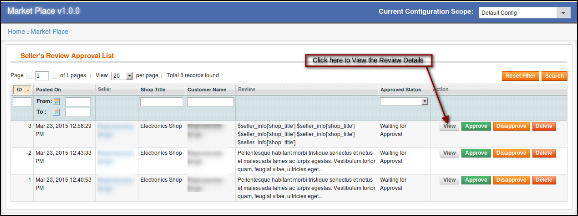
On clicking the View button a Pop-up will appear having all the details of the corresponding seller review.
Approve Seller Review: To approve a seller review, you have to click on the Approve button in front of that review on the list.
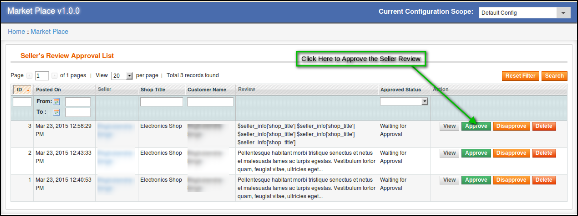
Once a seller review is approved it becomes visible in the front end and is transferred to the seller review list.
Note:- This action cannot be undone. Please use it carefully.
Disapprove Seller Review: To disapprove of a seller review, you have to click on the Disapprove button in front of that review on the list.
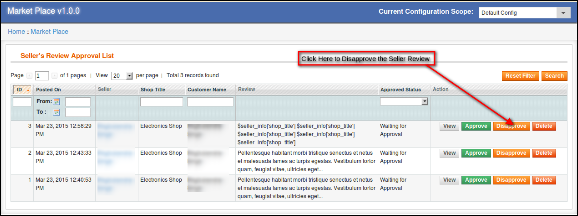
A pop-up will appear asking for the reason for the disapproval of the seller review. Fill the reason and then submit the form to complete the action.
Once a seller review is disapproved it is transferred to the seller reviews list and cannot be found anywhere else.
Note:- This action cannot be undone. Please use it carefully.
Delete Seller Review: To delete a seller review, you have to click on the Delete button in front of that review on the list.
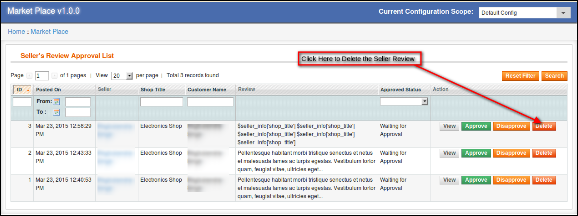
A pop-up will appear asking for the reason for the deletion of the seller review. Fill the reason and then submit the form to complete the action.

Once a seller review is deleted it is completely removed from everywhere.
Note:- This action cannot be undone. Please use it carefully.
4.8 Product Approval Request
When a seller adds a product then, first of all, it appears here and the store owner is also notified for the same through the mail. Then it is up to the store owner to approve or disapprove the product.

If the setting (i.e. Product Approval Required) is on then only a new product is added appears in this list otherwise it directly appears in the Product List and is automatically approved and enabled.
Disapprove Seller Product: To disapprove of a product, you have to click on the Disapprove button in front of that review on the list.
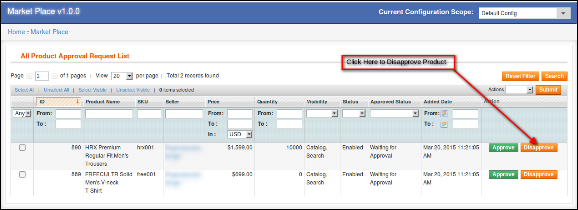
A pop-up will appear asking for the reason for the deletion of the seller review. Fill the reason and then submit the form to complete the action.

Once a product is disapproved a mail will be sent to the seller notifying the disapproval of the product. The disapproved products also appear on the same list. The Store admin can approve them anytime.
Approve Seller Product: To approve a product, you have to click on the Approve button in front of that review on the list.
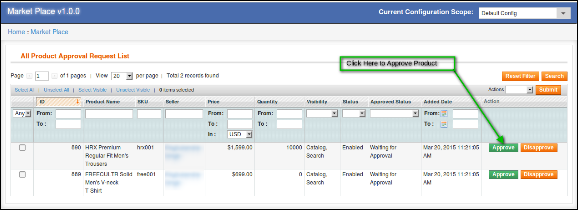
Once a product is approved it transfers from this list to the Sellers Products list.
Note:- This action cannot be undone. Please use it carefully.
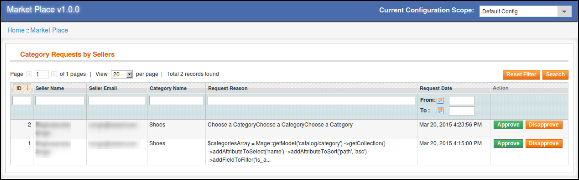
4.9 Category Request List
A seller can add the product to categories that are allowed to that seller. In case, the seller needs to add a product to a category that is not allowed, then, the seller can request for the same. All those category requests appear in the Category Request by Seller list of the Magento multivendor marketplace module as shown below. A mail is also sent to the store owner to notify the Request for Category. Then it is up to the store owner to approve or disapprove the request.
Approve Category Request: To approve a category request, you have to click on the Approve button in front of that category request on the list.
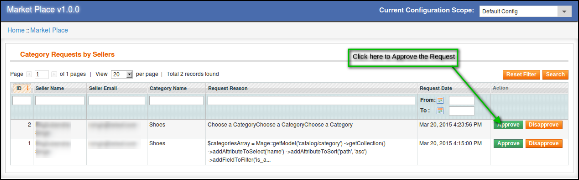
A pop-up will appear in the back-end of the Magento multi-vendor marketplace extension asking for the reason for approving the category request. Fill the reason and then submit the form to complete the action.

Note: This action cannot be undone. Please use it carefully.
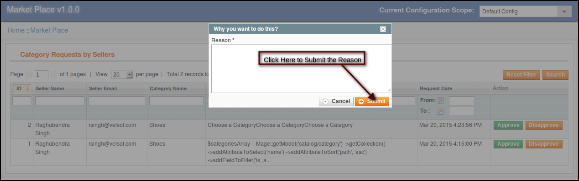
Disapprove Category Request: To disapprove of a category request, you have to click on the Disapprove button in front of that category request on the list.
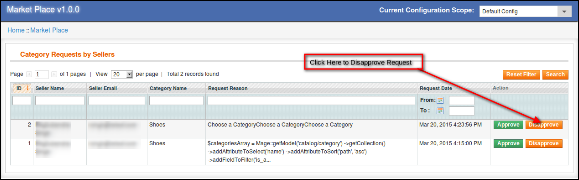
A pop-up will appear asking for the reason for disapproving the category request. Fill the reason and then submit the form to complete the action.
Note:- This action cannot be undone. Please use it carefully.
4.10 Reports
4.10.1 Reports -> Best Selling Products
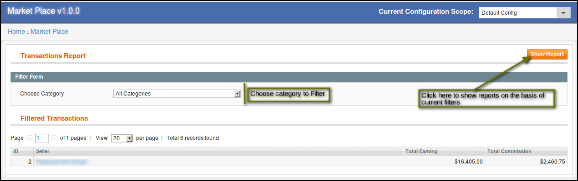
The Report tab of the Magento multi-vendor marketplace helps the store owner to identify the best selling products added by the sellers. The store owner can also use multiple filters for the best selling product reports.
The filters help the store owner identify best selling product :
- For a date range.
- For a specific category.
- For a specific seller.
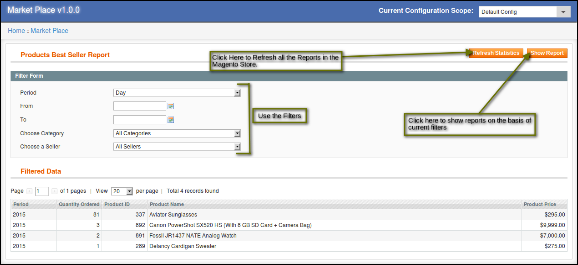
Note:- Sometimes you may be unable to find any data in this report. In that case, you have to refresh the report statistics and to do that you have to do the following:
Go To Reports -> Refresh Statistics -> Select The Desired Reports to Refresh -> Submit
Or
Click on the Refresh Statistics Button on the top of this page.
4.11 Transactions and Earnings
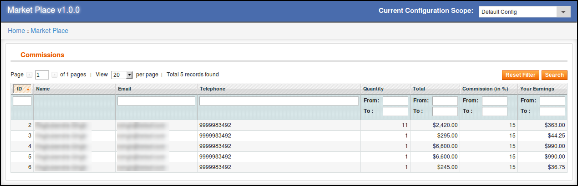
4.11.1 Transactions and Earnings -> Commissions
The Commission list of the Magento multi-vendor marketplace extension contains all the commissions earned by the store owner on several orders with commission percentage and total sale of the seller.
4.11.2 Transactions and Earnings -> Category wise commissions
The Transactions and Earnings page of the Magento multivendor marketplace module shows the report for the commissions earned by the store owner. This report shows the total commission earned by the store owner from a seller. The store owner can also use filters to filter the commission reports category wise.
This feature offered by the Magento multi-vendor marketplace extension helps the store owner to identify commissions from different categories and which category has produced how much commission.
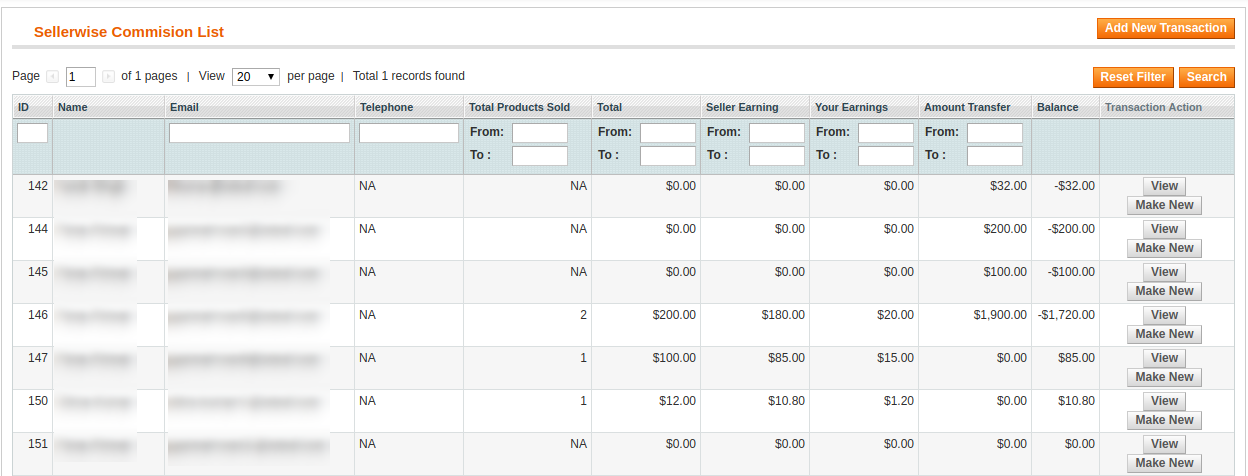
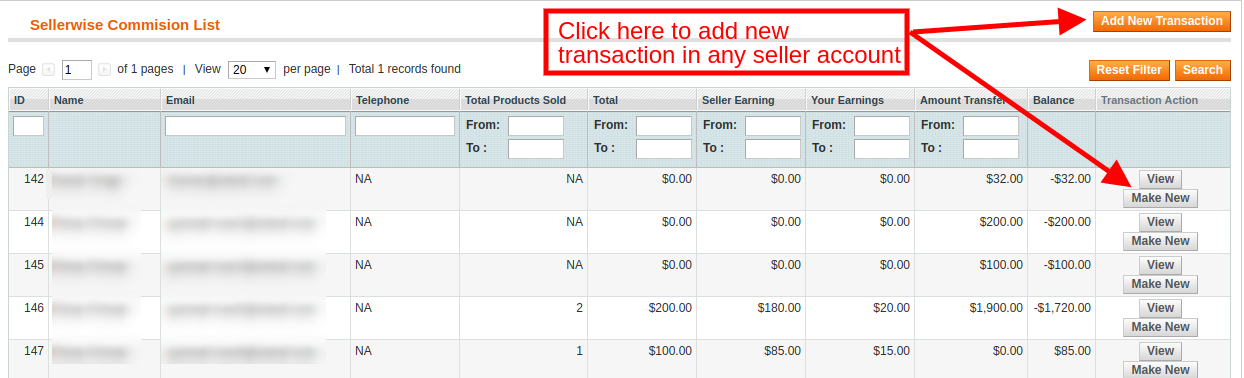
4.11.3 Transactions and Earnings -> Seller wise transaction
The system does not automatically transfer the amount in the seller’s account. Hence the store owner has to keep records of the balance for all the sellers and manually transfer money to the seller and then enter the details of the transaction to keep a record of the same.
This list contains all the balance variations for all the sellers in the system. The list shows total sales of the seller, seller earning, your commission. This list helps the store owner to identify the earning and categorize them seller wise.
4.11.3.1 How to View Transactions Details?
To view the details of the transactions done for a particular seller, you have to click on the View button in front of that seller.

On clicking on the View button in front of any seller a new page will open having a list of all the transactions done for the corresponding seller.
You can also add a new transaction for the current seller by clicking on the Add New Transaction button on the top right portion of the Magento multi-vendor marketplace plugin.
4.11.3.2 How to Add New Transaction in the seller’s payout details?
To add a new transaction detail for any seller, you have to either click on the Add New Transaction button corresponding to respective sellers.
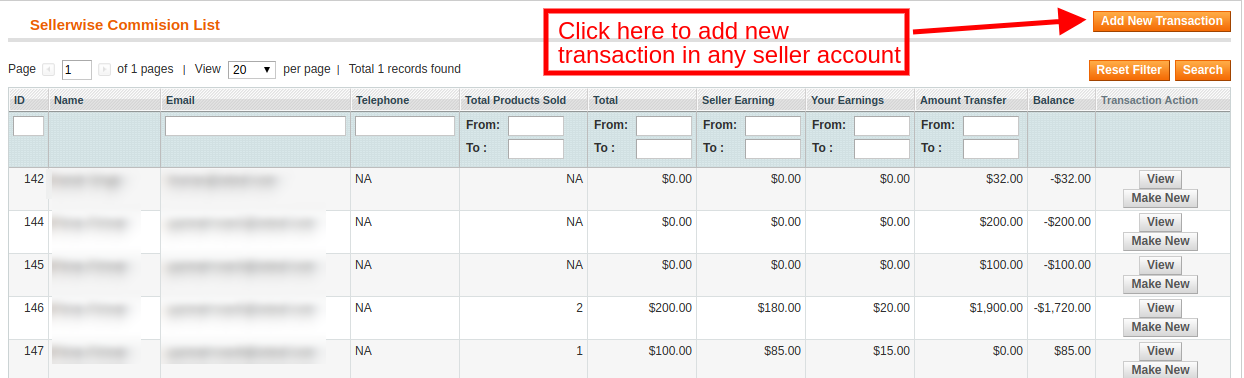
On clicking the button a pop-up appears asking for the details of the transaction. Fill the form and submit the form to complete the action.
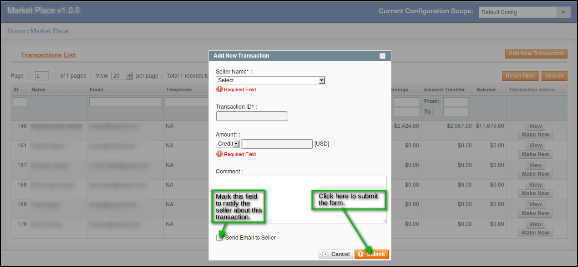
The various fields of the pop-up are discussed:
Seller Name: Select the name of the seller from the drop-down list.
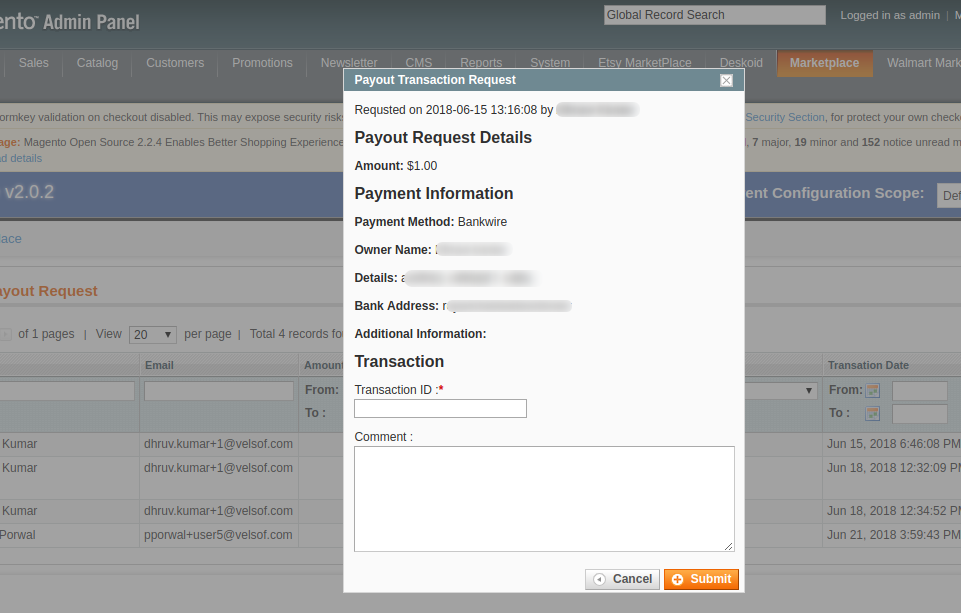
Transaction ID: Enter the transaction ID here.
Amount: Select whether the amount was debited or credited and then enter the amount.
Comment: Enter a comment regarding the transaction.
Additionally, the admin can even add a new transaction in the seller’s account by clicking on the Make New button corresponding to each seller account.
Note:- This action cannot be undone. Please use it carefully.
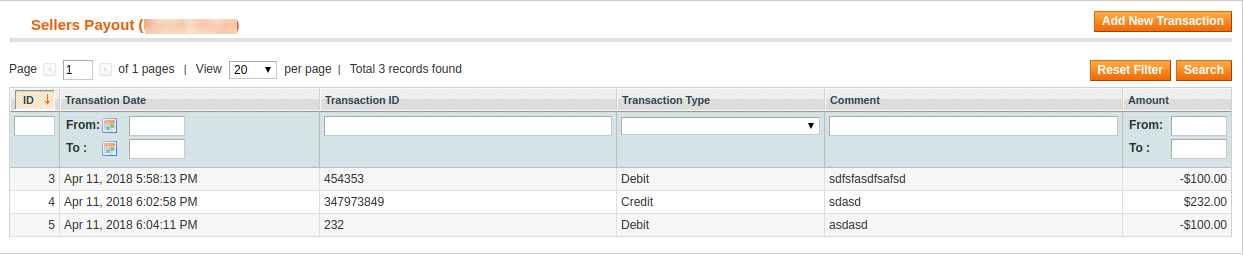
4.11.4 Transactions and Earnings -> Seller Payout
This page contains a list of all the transactions done to date to all the sellers available in the system.
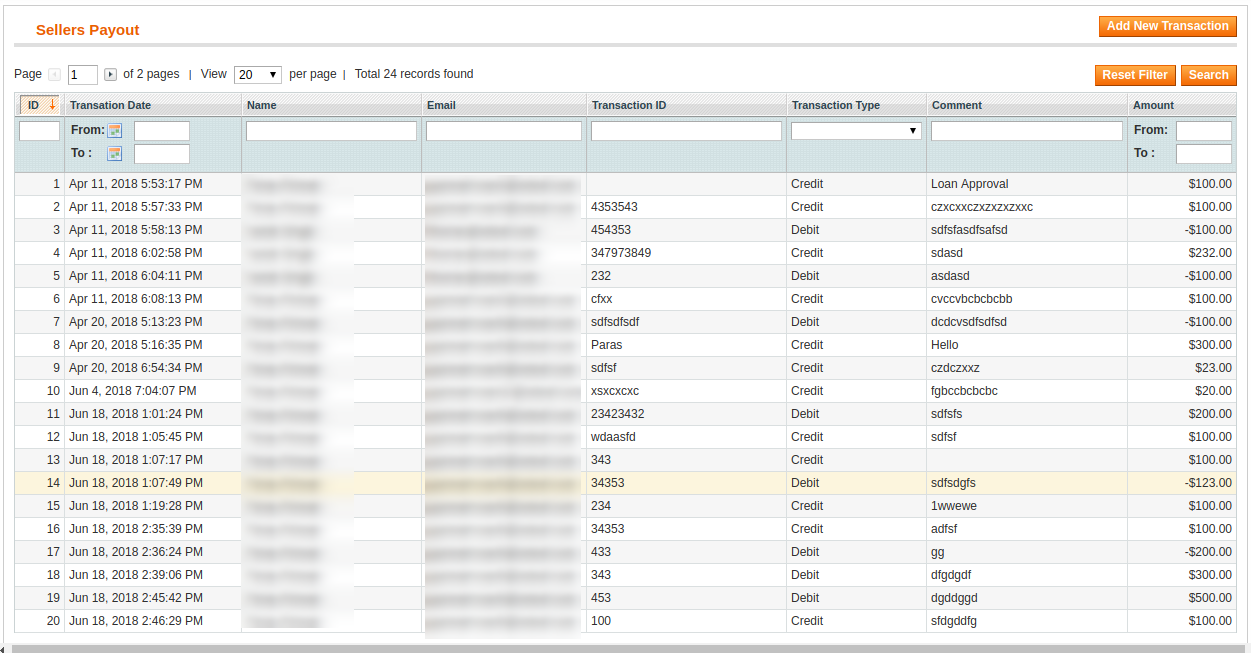
You can also add a new transaction for any seller by clicking in Add New Transaction button on the top right of the above page.
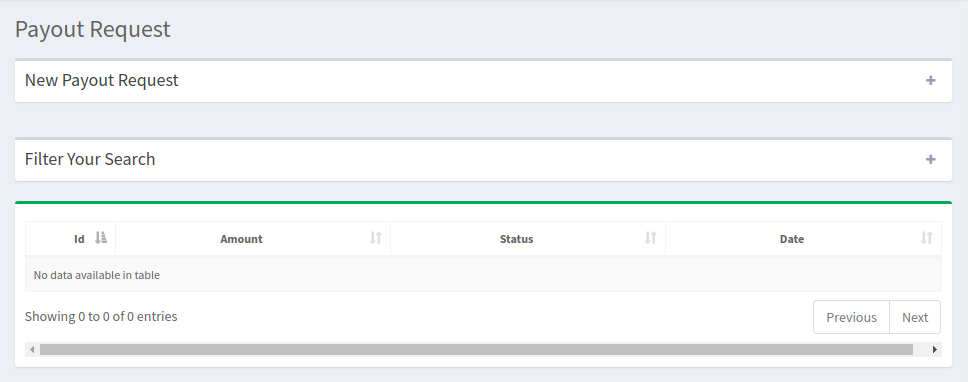
4.11.5 Transactions and Earnings -> Seller Payout Request
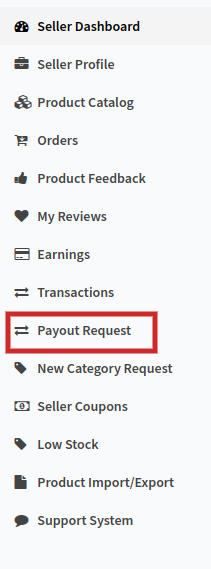
The seller can send a payout request to the store admin from their dashboard. The seller’s request is viewed by the admin from this tab of the Magento Marketplace extension. The Dashboard of the seller includes an option of Payout Request.
On clicking this link, the seller will be redirected on the section of the dashboard as shown in the image below:
4.11.5.1 How can the sellers add a new payout request from their dashboard?
Before the seller can request for the payout, he needs to configure the payout the Profile menu of the Dashboard. The various fields required to be filled in this section are discussed below:
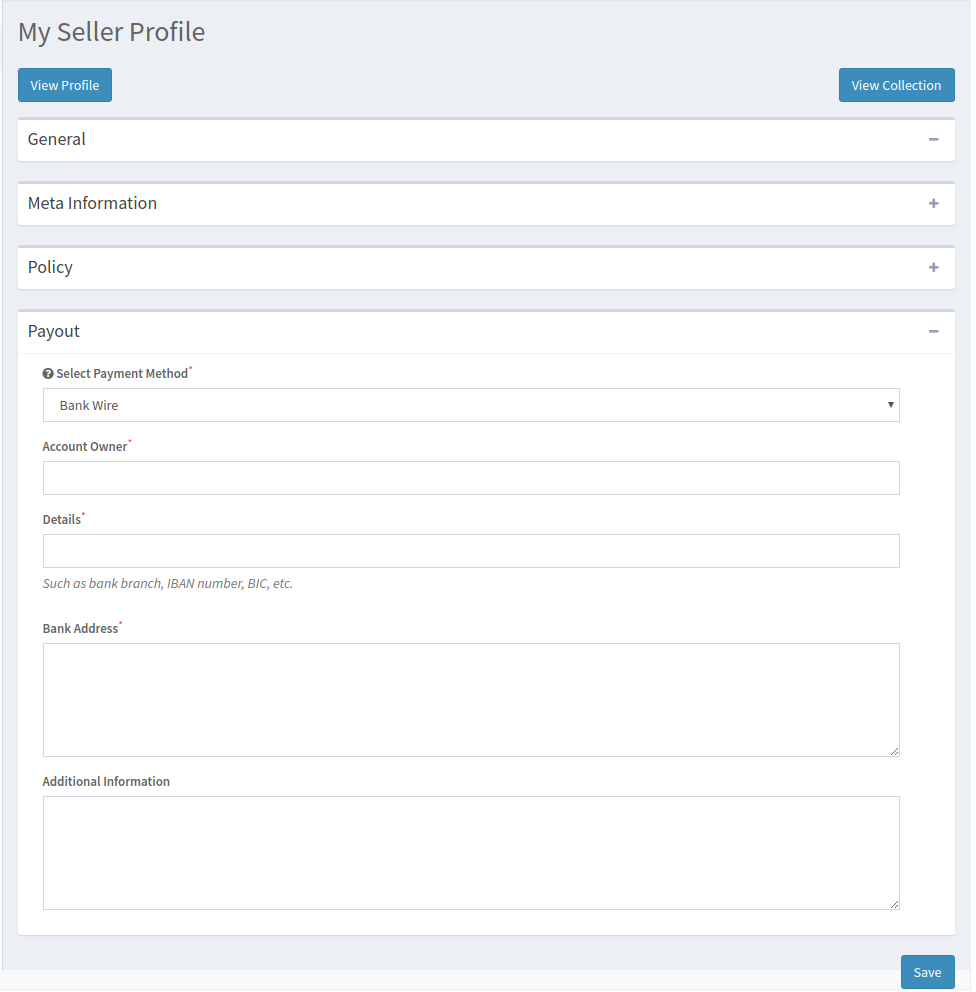 Select Payout Method: The various payout methods in the drop-down menu. Select the method that you want to use for the payout. There are three options available by default:
- Bank Wire
- Payment By Cheque
- PayPal
1. Bank Wire:
On selecting, Bank Wire options, you’ll be required to provide the following information.
Account Owner: Enter the name of the owner of the account in which the amount is to be transferred.
Details: This section includes the bank details such as bank branch, IBAN, BIC, etc.
Bank Address: Enter the address of the bank.
Additional Information: Provide any information that you would like to share with the store admin.
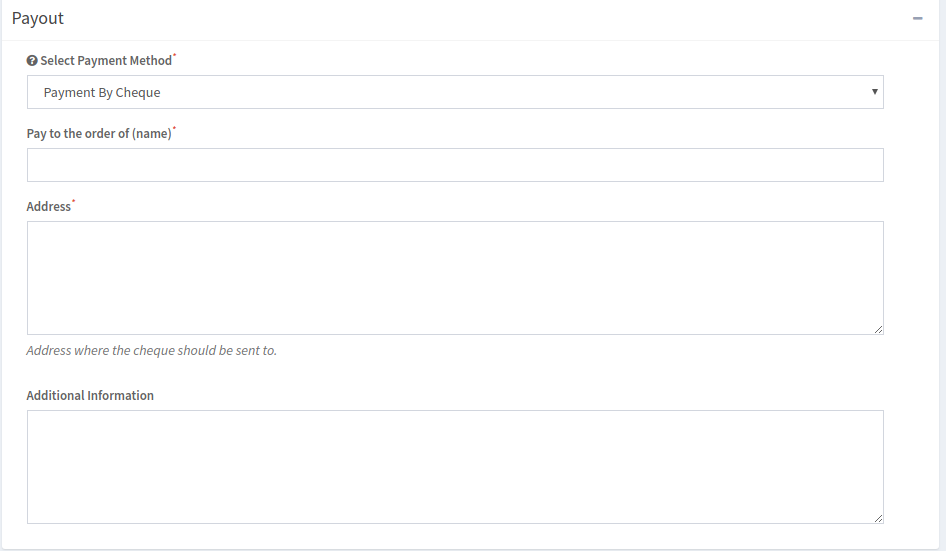
2. Payment By Cheque
Pay to the order of entering the name to which the cheque is to be issued.
Address: Provide the address for sending the cheque in this section.
Additional Information: Provide any information that you would like to share with the store admin.
3. PayPal
In case you select, PayPal, you will be required to enter your PayPal Email ID. The additional information section allows you to provide any information that you would like to share with the store admin.
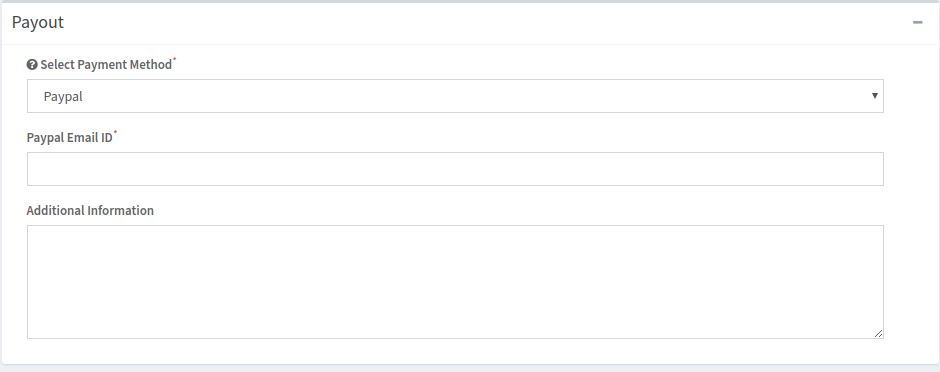
Once the payout method is configured in the seller’s profile, the vendor becomes eligible to send the payout requests.
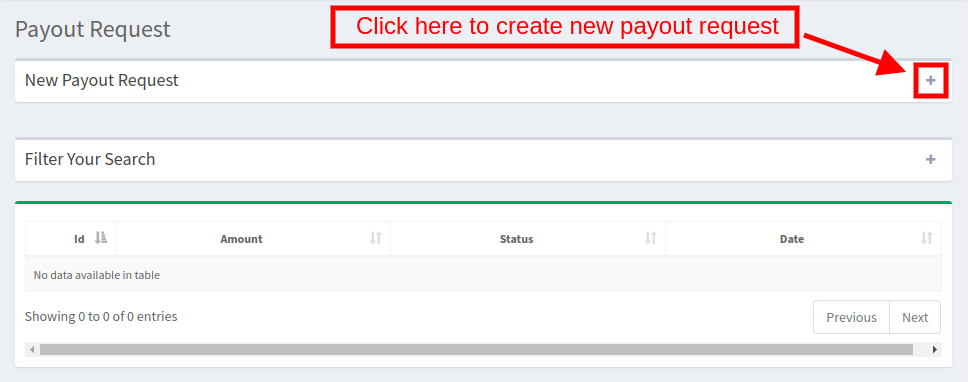
To add new payout request click on the ‘+’ in the New Payout Request section as shown in the image below:

Fill up a small form to send the request.
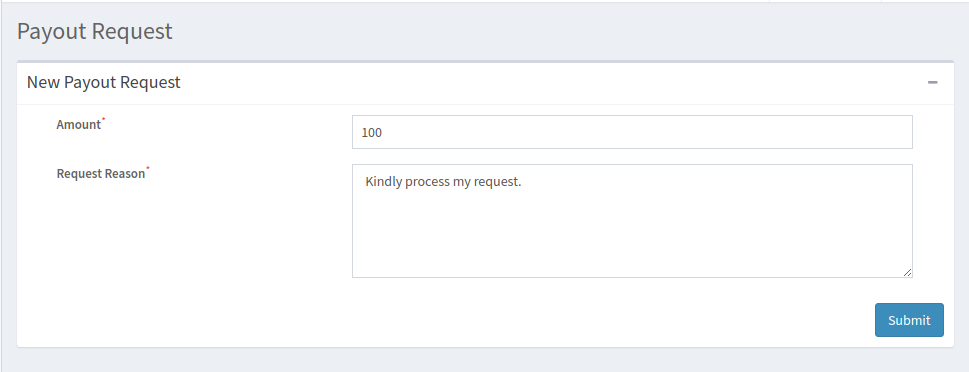
Amount: Enter the amount of the payout request.
Request Reason: Enter the reason for the payout request.
The payout request is, then, send to the admin for approval.
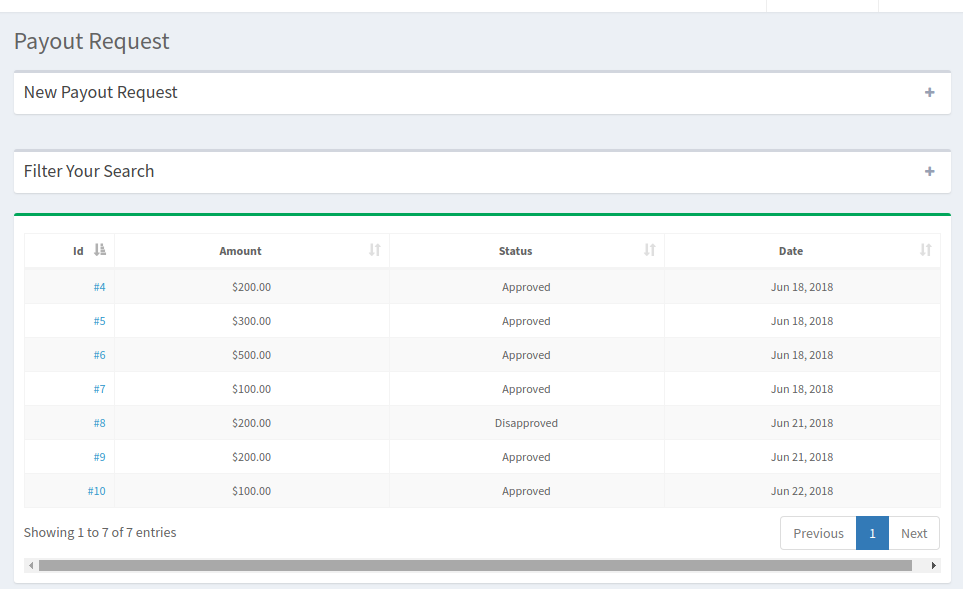
The payout requests that are approved or disapproved or waiting for approval can be viewed in the payout request section as shown below:
The store admin can view all the payout requests of the sellers of the marketplace in the back-end of the Magento Multi-vendor marketplace extension.
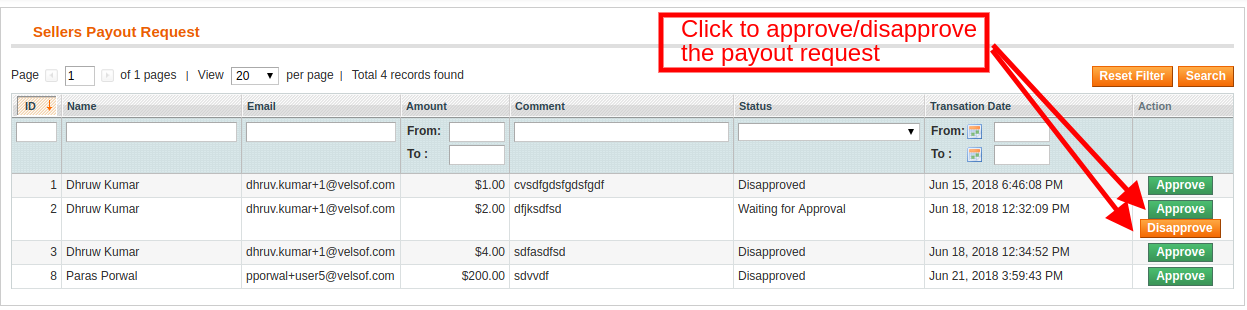
On clicking on the Approve button, a popup will be shown. Enter the transaction ID and comment to approve the request of the seller.
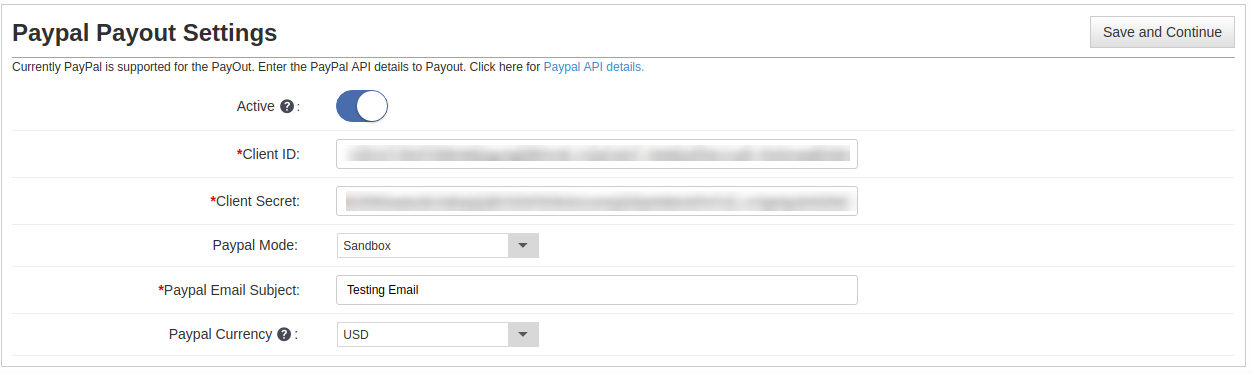
4.11.6 Transactions and Earnings -> PayPal Payout Settings
The PayPal Payout Settings of the Magento Multi seller Marketplace extension allows the store admin to enable the PayPal methods for the payout. Enter the required details as discussed below:
Active: Toggle the button to activate the PayPal payment method.
Client ID: Enter the Client ID of your PayPal account.
Client Secret: Enter the Client Secret of the PayPal account.
PayPal Mode: Select the PayPal mode from the drop-down menu.
PayPal Email ID: Enter the email ID used in your account.
PayPal currency: Select the default currency for the PayPal transaction.
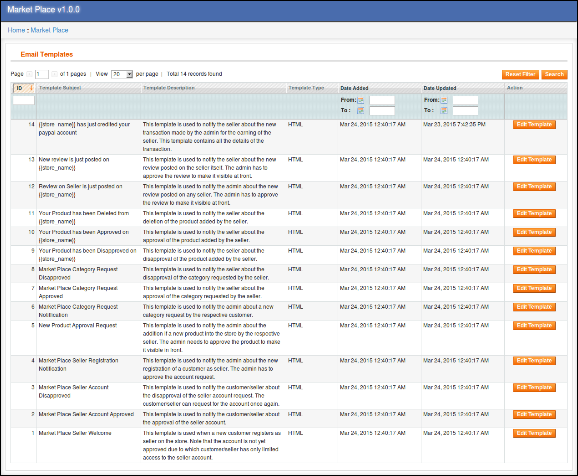
4.12 Email Templates
The Email Templates tab of the Magento multi-vendor marketplace module contains a list of all the email templates that are used in the system with all the details of the email templates.
Edit Email Template: To edit an email template click on the Edit Template button in front of any email template.
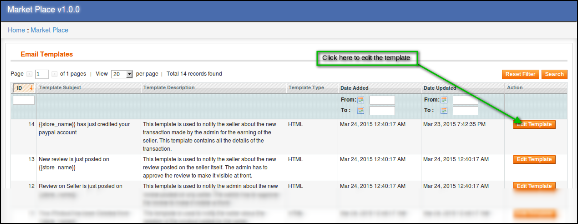
On clicking on the Edit Template button a new page opens having a form for the email template. You can change the email template as desired from the admin interface of the Magento multivendor marketplace.
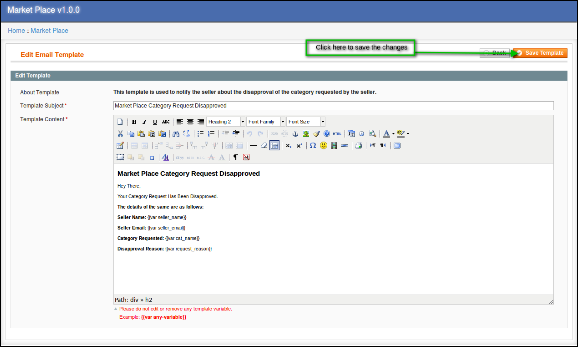
To save the changes made in the email template click on the Save Template button on the top right of the above page.
Note:- While editing the email template please keep in mind that you don’t edit any text inside the curly brackets (i.e. {{var any_var}}).
4.13. Vacation Mode
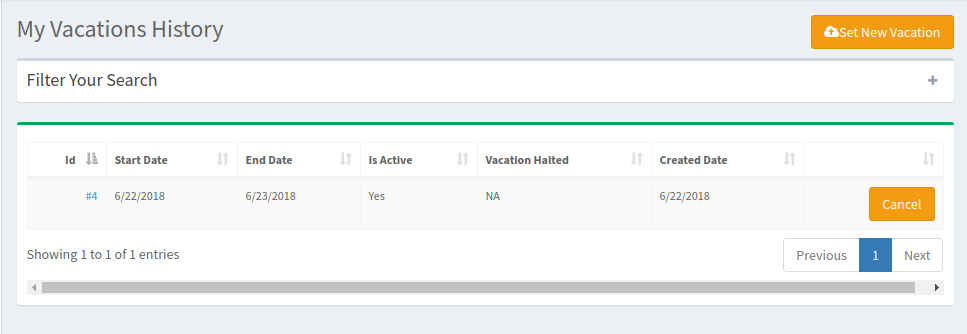
The sellers get an option to disable their shop from the marketplace for a particular period. The request of the sellers to go on vacation mode can be viewed in this section of the Magento Marketplace module.
To set the vacation mode, the sellers can go to the Vacation mode tab of their dashboard.
The tab shows the entire vacation history of the seller as shown in the image below:
4.13.1 How to Set the Vacation Mode?
To set the vacation mode, click on the ‘Set New Vacation’ button.
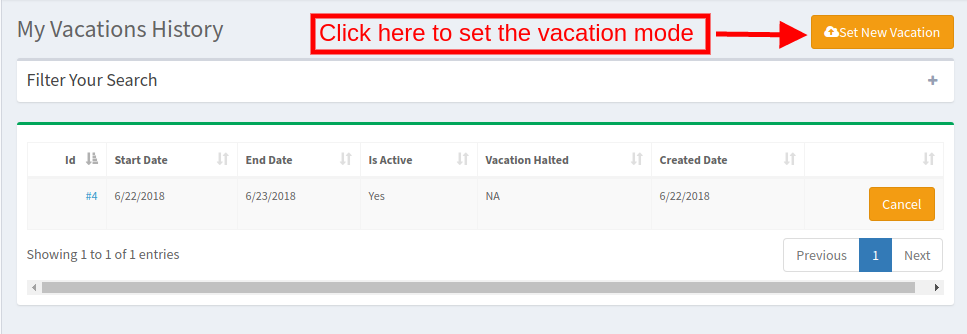
On clicking the button, a popup will appear as shown in the image:
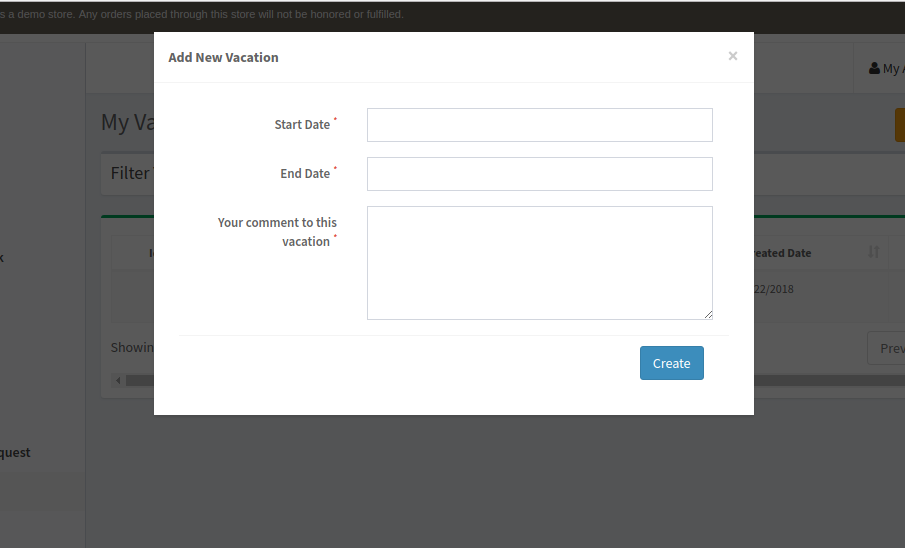
Start and End Date: Enter the start and end date of the vacation.
Your comment to this Vacation: Enter a comment for the vacation mode.
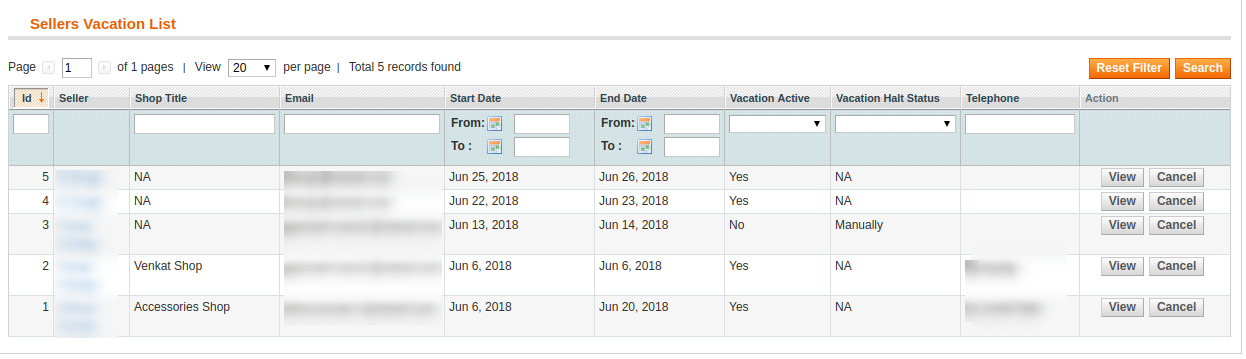
The admin can view the list of the seller who is on vacation in the Vacation tab of the Magento Marketplace plugin.
To see the details of the vacation, click on the View button.
The admin can cancel the request by clicking on the Cancel button.
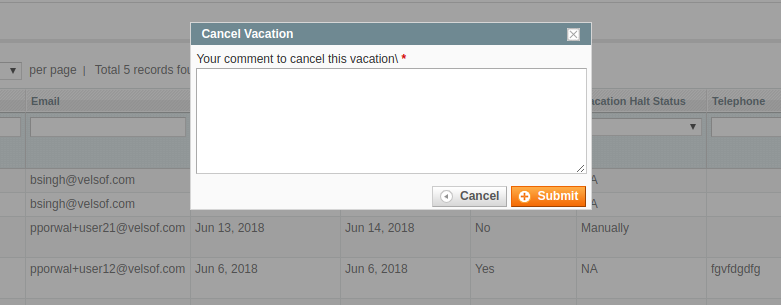
A popup will be displayed. Enter the reason for canceling the vacation mode and submit.
An email notification is sent to the seller informing them about the cancellation of the vacation.
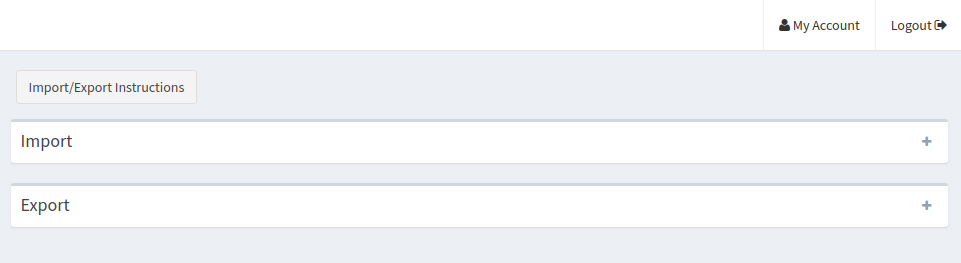
4.14. Bulk Import/Export
The admin can offer this feature of bulk import and export to the sellers by enabling the same from the back-end.
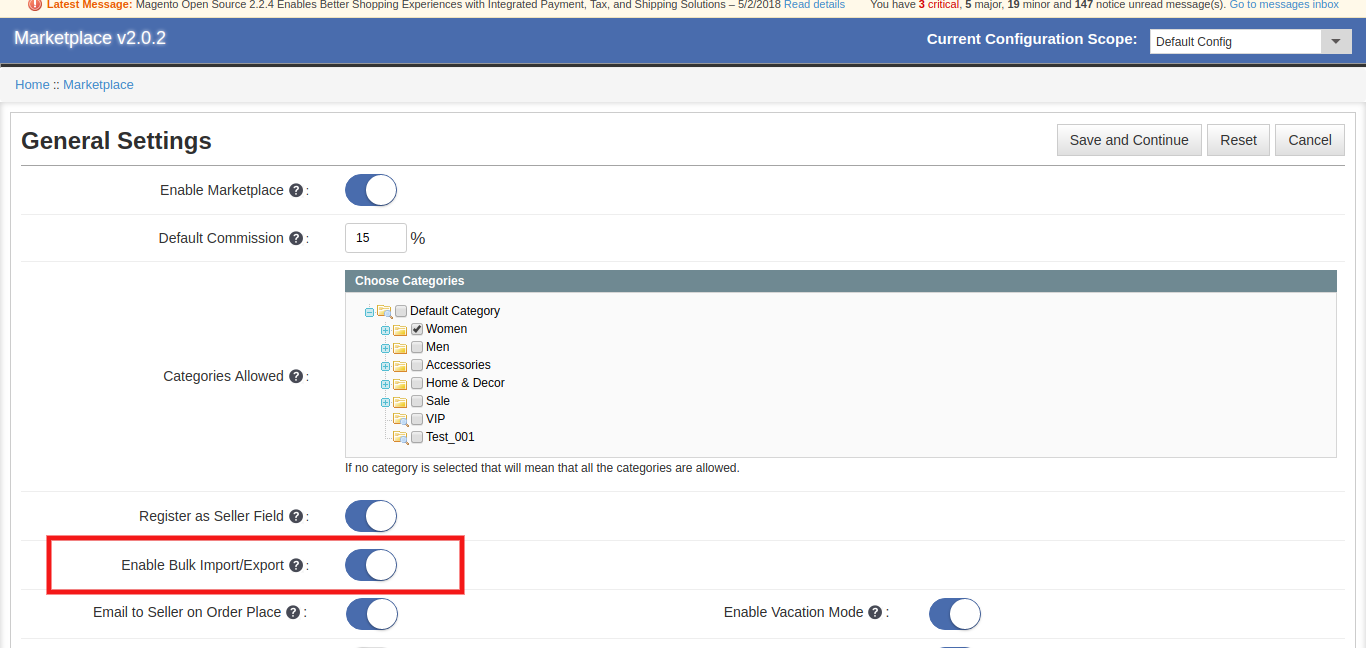
If enabled the seller can import or export of the products in bulk from their dashboard.
The vendors can import/export the products in bulk from the Product Import/Export tab as shown below:
4.14.1 How to Import the products in bulk?
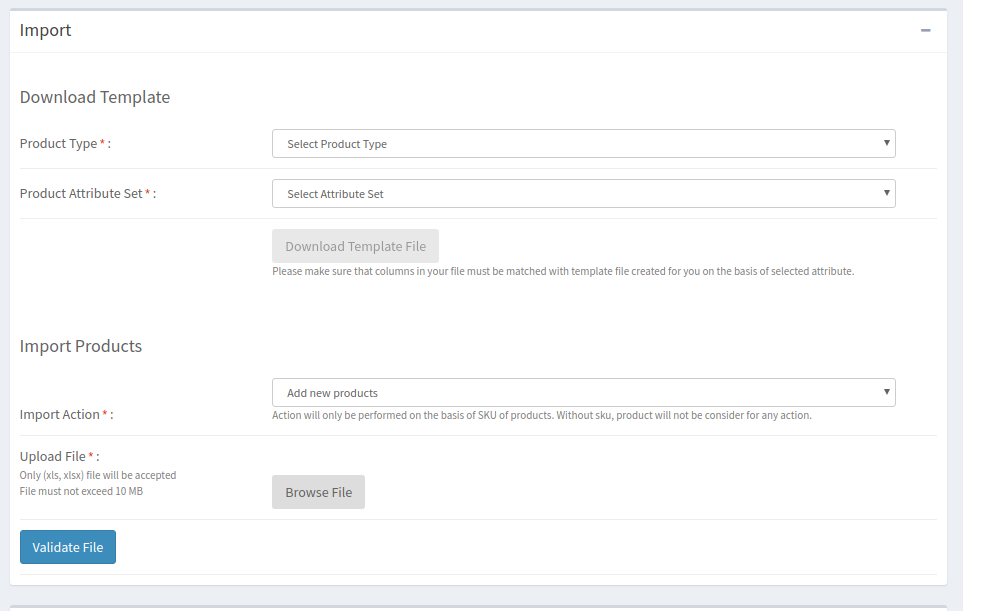
Product Type: Select the type of product that you are uploading. The Magento Multi seller Marketplace Plugin supports all type of products, that is, simple, configurable, virtual and others.
Product Attribute Set: Select the attribute set of the products from the drop-down list.
Download Template File: You can download the template file in an excel sheet for the selected attribute by clicking on this button.
Please make sure that columns in your file must be matched with the template file created for you based on the selected attribute.
Import Action: Select the import action from the drop-down list. Action will only be performed based on the SKU of products. Without SKU, the product will not be considered for any action.
Upload File: Upload the file with the product details here.
Click on the Validate File to complete the import.
4.14.2 How to Export the Products in Bulk?
The seller can export the product details listed in the marketplace from this section. Select the Export Type from the drop-down menu and click on Export.
The details will be exported in an excel sheet.

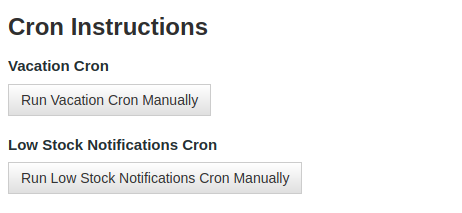
4.15. Cron Instruction
This tab offers two cron options. Execute vacation cron to implement the changes made in the Vacation tab of Magento Multi-vendor Marketplace module in the front-end of the marketplace.
Run Low Stock Notification Cron to send the low stock notifications email to the sellers.
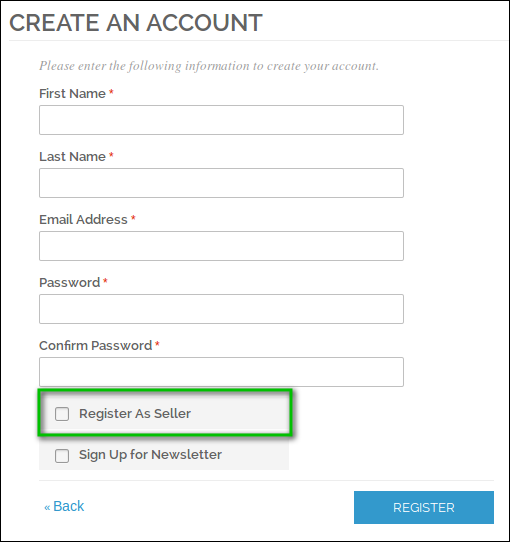
5.0 Register As Seller Field – Register Page
If a new customer is registering in the Magento marketplace store, then, there is an additional field on the Register Page. If the customer wants to Register as Seller than the customer has to mark this field.

Once the account is created, the sellers get access to the dashboard.
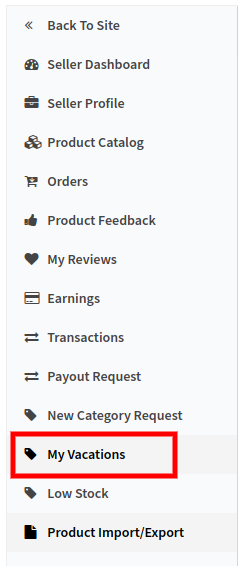
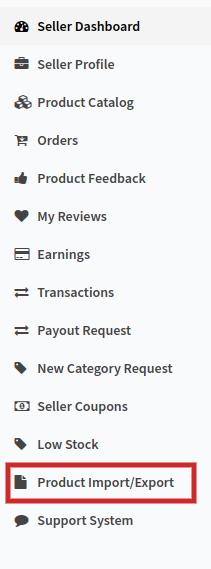
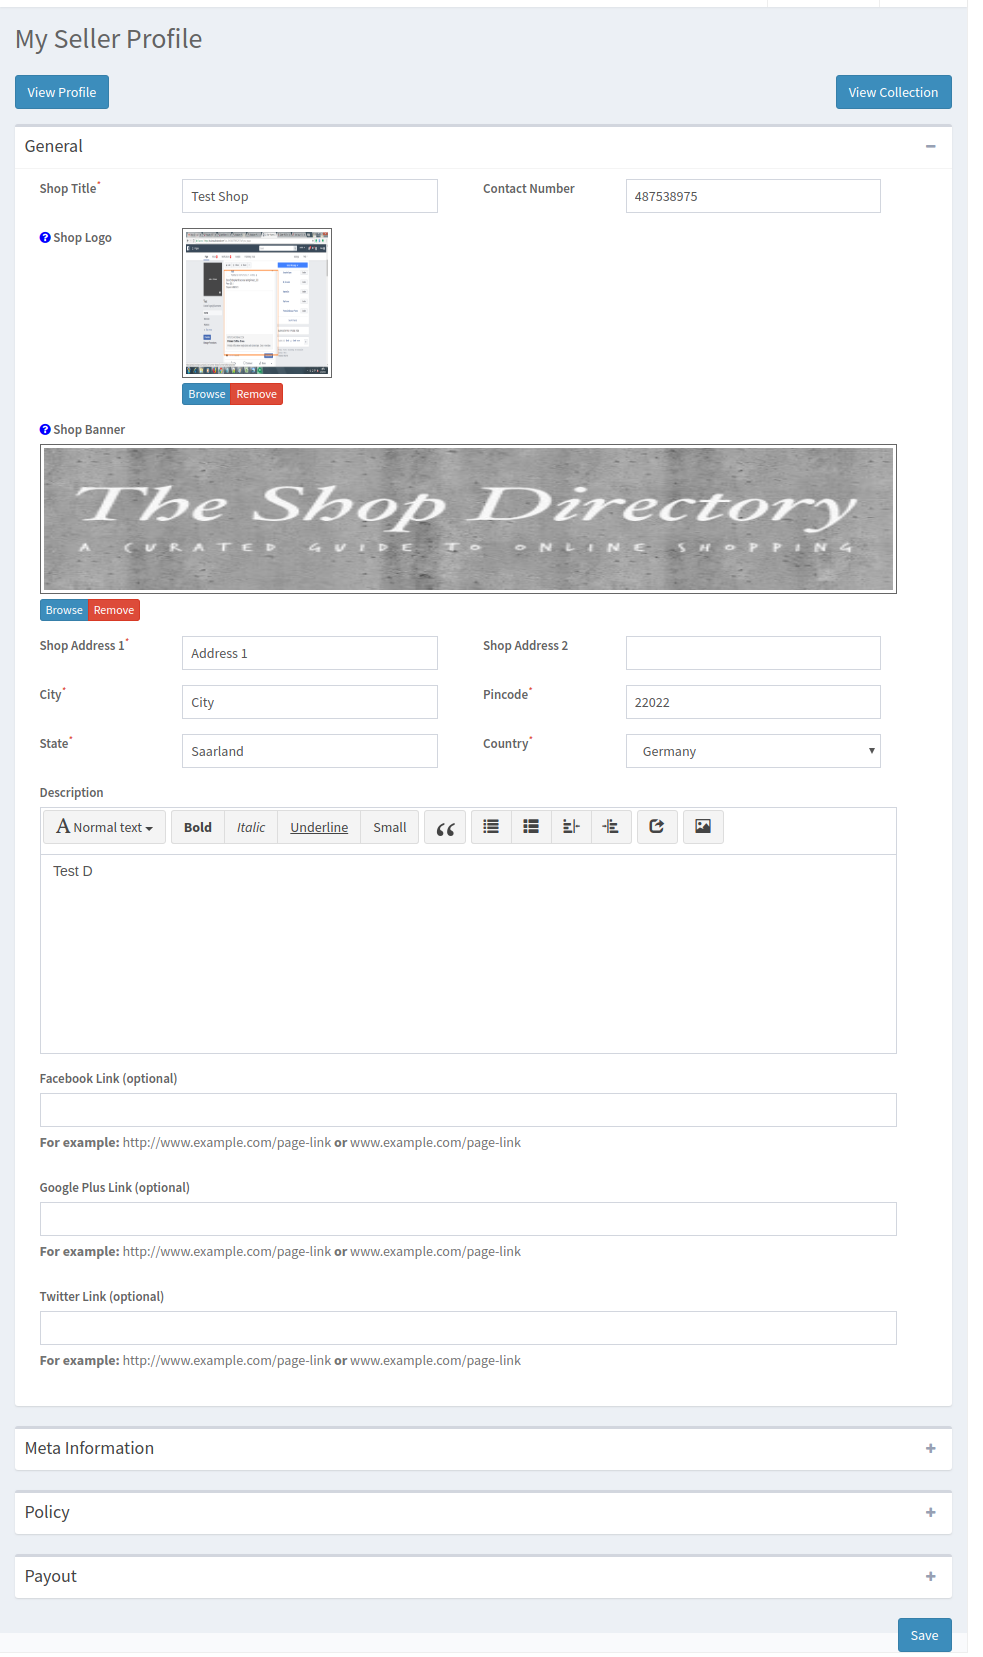
The dashboard of the seller offers several options to the sellers as shown in the image below:
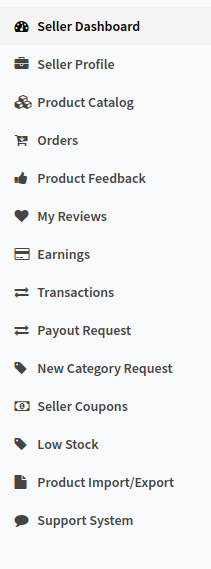
They can configure their profile by clicking on the Seller Profile tab.
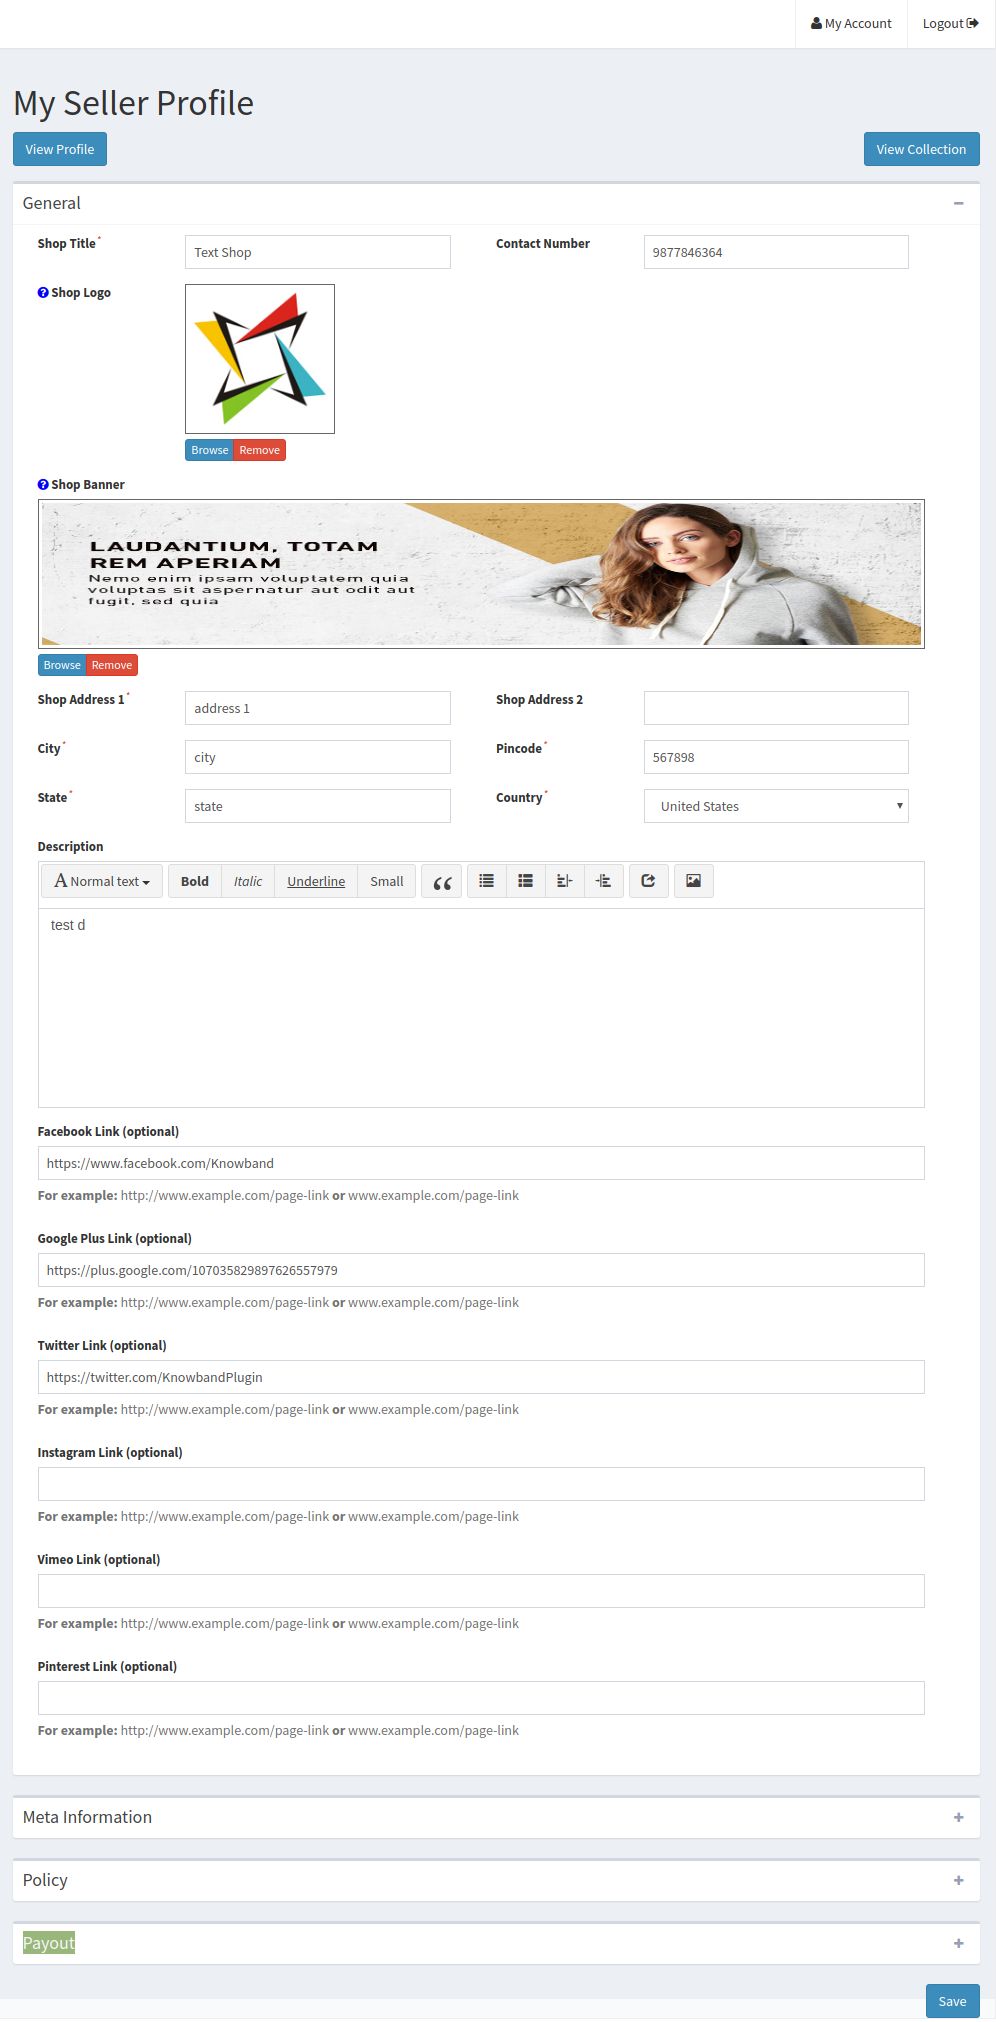
The sellers can view their profile by clicking on the ‘View Profile’ button. Additionally, they can even see their collection by clicking on the ‘View Collection’ Button.
5.1 How sellers can generate a coupon?
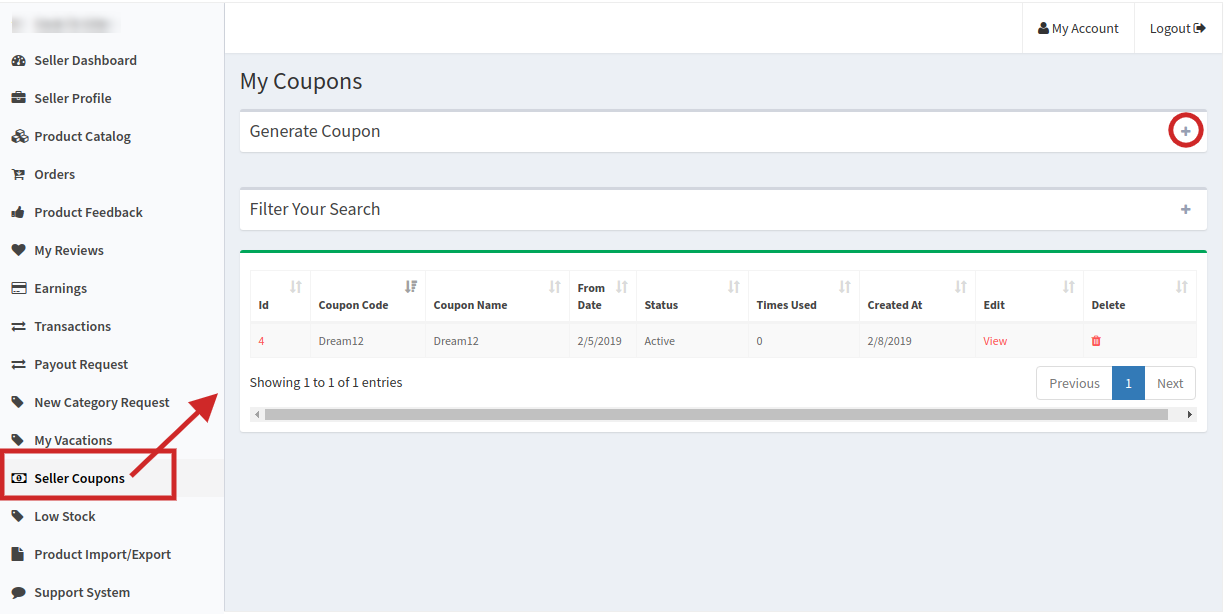
Steps to follow to generate a coupon:
- Click on the seller coupon tab available in the seller dashboard.
- Click on the “+” icon and fill the following fields in the form and following form will appear in front of you:
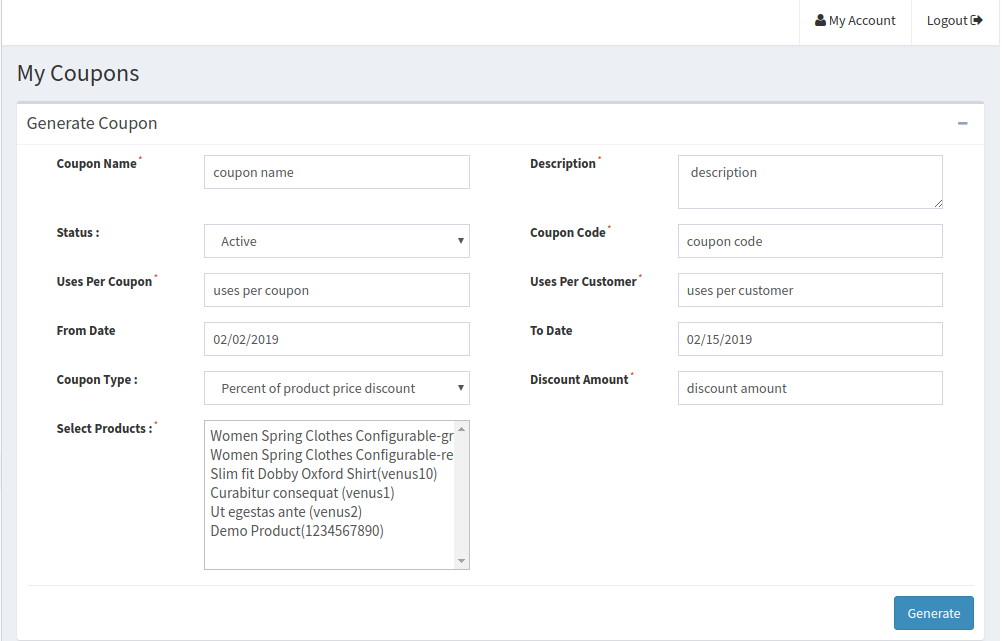
Coupon Name: Enter the name of Coupon here.
Description: Fill the Coupon description here.
Status: Select the status of coupon here.
Coupon Code: Set the coupon code here. Customers can use this coupon to avail of the discount.
Uses per Coupon: Set the number of times a coupon can be used.
Uses per Customer: Maximum number of times customers can use the coupon.
From Date to To Date: Set the time for which the coupon will be valid.
Coupon Type: Select the type of coupon here. Coupons can be fixed type and percentage type.
Discount Amount: Enter the amount value of the discount here.
Select Products: Select the products on which the seller wants to offer the discount coupon.
Click on the “Generate” button to generate a coupon.
5.2 Tax Class
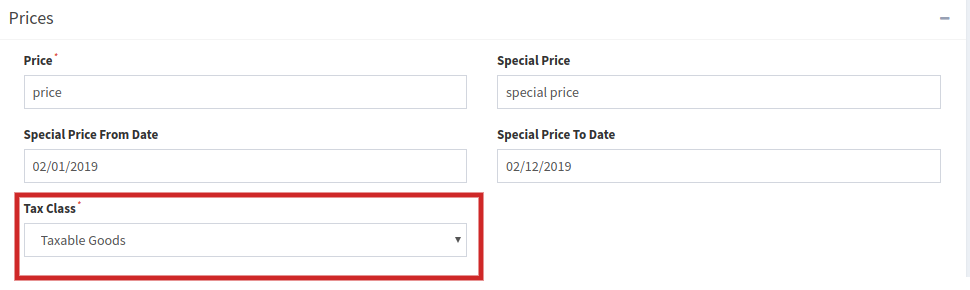
A tax class is a class assigned to a product by the sellers. Tax class helps in distinguishing between taxable goods and non-taxable goods. In the product Catalog, while filling the product details for a new product, the seller can select the tax class, in price tab of the Product Catalog, that he wants to assign to the items/services.
5.3 Customer Support System
For the seller ticket system, the Marketplace admin needs to enable the seller ticket system feature in the General setting tab in the backend.
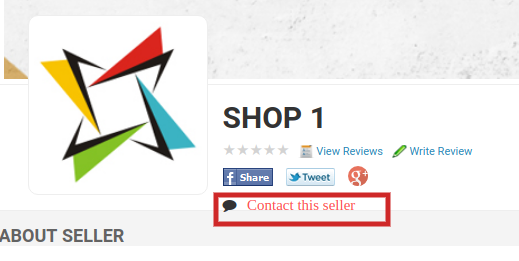
Once the feature is enabled at the backend, the customer can directly contact the sellers. Whenever a customer will contact a seller, a ticket will be generated, the seller can view the ticket in the customer support system of the seller dashboard.
5.3.1 How customer can contact a seller?
- Click on the seller tab at the frontend of the store.
- A seller list will appear before you.
- Click on the seller will take the customer to the seller profile page.

- The customer needs to click on the contact the seller link and a form will appear before them.
- Once the customer will submit the form, the respective seller will receive a ticket.
Watch how Magento Multi seller Marketplace module works?
For further information, refer to the following links:
- Magento Multi-vendor Marketplace User Manual
- Magento Multi-vendor Marketplace Admin Demo
- Magento Marketplace Front Demo
Liked This? You’ll Like These Too
